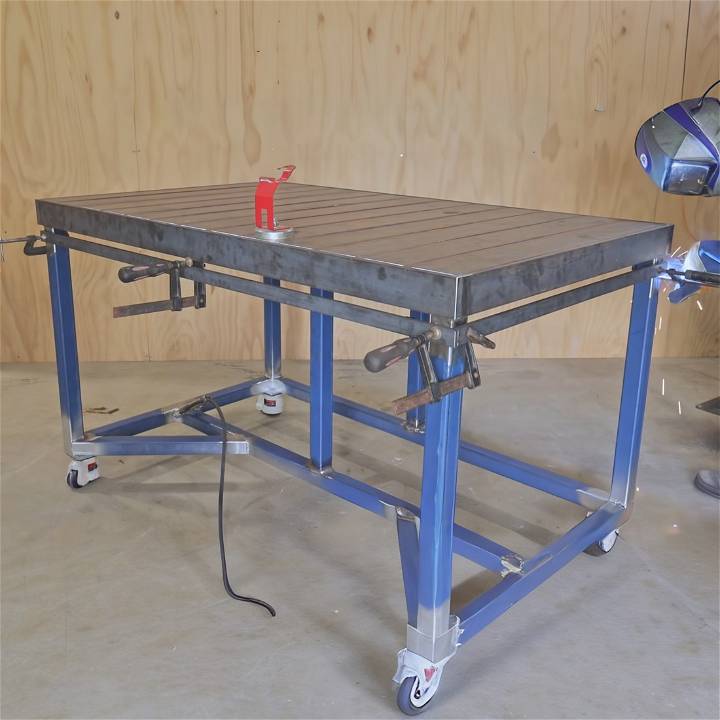
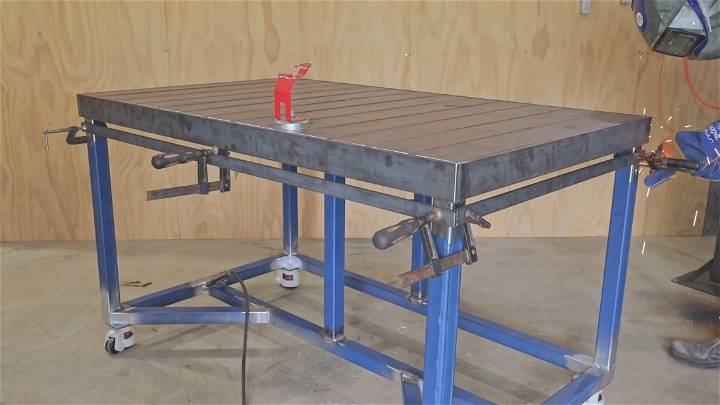
Making a DIY welding table can be a rewarding project that enhances your welding experience, offering both practicality and customization. Learn the basics of welding table design that cater to your specific needs while ensuring cost-effectiveness. This guide is curated to help you understand the importance of design principles and how they contribute to making a functional workspace.
Understanding design features and safety guidelines is crucial for maximizing the utility and longevity of your welding table. This introduction lays the foundation for building a cheap DIY welding table that doesn’t compromise quality.
Keep reading for detailed steps on material selection, assembly, and customization options that will elevate your welding projects to the next level.

Introduction to Welding Table Design Principles
Welding tables are the foundation of a good welding setup. They provide a stable, heat-resistant surface for you to work on. A well-designed table can make your welding projects easier, safer, and more efficient.
Why Design Matters
The design of your welding table affects everything from comfort to safety. A table that’s too high or too low can cause back strain, while a table that’s not heat-resistant can be a fire hazard. The right design will give you a flat surface that’s at the right height and can withstand the high temperatures of welding.
Key Design Features
When designing your welding table, consider these features:
- Stability: A solid base that prevents wobbling.
- Durability: Materials that can withstand heat and weight.
- Size: Enough space to work comfortably but fits in your workspace.
- Accessibility: Places to store your tools for easy access.
Safety Guidelines for Welding Table Use
Safety should be your top priority when using a welding table. Here are some guidelines to keep in mind:
Personal Protective Equipment (PPE)
Always wear the right PPE, including:
- Welding helmet: Protects your eyes and face from sparks.
- Gloves: Shields your hands from heat and metal splatter.
- Apron or jacket: Protects your body from sparks and heat.
Workspace Organization
Keep your workspace organized to prevent accidents. This means:
- Clear space: Keep the area around your table clear of clutter.
- Proper lighting: Ensure you have enough light to see what you’re doing.
- Fire safety: Have a fire extinguisher nearby in case of emergencies.
By following these design principles and safety guidelines, you’ll build a welding environment that’s both effective and secure.
Step by Step Instructions
Learn how to build a welding table on a budget with these cheap DIY welding table plans. Get step-by-step instructions for making your own welding workspace.
Step 1: Gather Your Materials and Tools
Before starting, ensure you have all the necessary steel pieces and tools required for the job. For the frame, a common size to use is 50mm x 50mm square tube steel. Make sure to have your steel supplier cut the materials to length to save time. You will also need a welding machine, grinder, and safety equipment (gloves, goggles, apron).
Step 2: Prepare the Workspace
Since a large work surface may not be available, the ground can serve as your workshop base. To ensure everything is level, use the three-point contact method, where any three points build a plane. This technique can help to keep your frame level during assembly.
Step 3: Assemble the Frame
Start by preparing the joints and welding the frame together. Check the square and dimensions of the frame by measuring diagonally across corners. Adjust as necessary to ensure the frame is perfectly square and twist-free. Use a string line to help identify any twists and adjust your welds accordingly.
Step 4: Add the Legs and Join the Frames
Weld legs to the frame and then connect the upper and lower frames. Adding a cross beam in the middle of the frame for extra support is a good idea, ensuring stability and strength.
Step 5: Install Wheels
Adding wheels makes your workbench mobile and versatile within your workspace. Choose heavy-duty casters that can support the table’s weight and the projects you’ll be working on. Weld small support tabs so the wheels can attach firmly without altering the table’s height.
Step 6: Make the Tabletop
Use flat steel bars for the tabletop. Leaving gaps between the bars allows for easy clamping anywhere on the table. For versatility, fill these gaps with removable strips of metal, enabling you to have a smooth work surface when needed.
Step 7: Finish and Protective Coating
Clean the table thoroughly, removing any mill scale or debris. For protection, you can opt for paint or, as a simpler alternative, apply a coat of wax. Heat the metal slightly before applying the wax to help it penetrate and protect the surface.
Add Clamping Options
To maximize the functionality of your workbench, incorporate various clamping points and techniques. This could involve welding bolts under the tabletop to attach different fixtures, making slots along the edges for clamps, or even fabricating custom clamps suitable for your specific projects.
Video Tutorial
For a step-by-step video tutorial on building the ultimate welding table / workbench, watch this video from Pask Makes. It pairs well with this written guide, offering an engaging visual explanation of the instructions provided here, making complex procedures more digestible and easier to follow.
Construct a welding table or workbench to improve your welding skills and make a personalized workspace that will last.
Customization Ideas for Your DIY Welding Table
Customizing your welding table can greatly enhance its functionality and make your welding projects more enjoyable and efficient. Here are some ideas to personalize your workspace:
Adding a Clamp System
A versatile clamp system is essential for a welding table. It allows you to secure various-sized projects firmly in place. Consider incorporating a grid of holes on the tabletop where you can insert clamps as needed. This system provides flexibility and ensures that you can work on projects of all shapes and sizes.
Integrating Tool Storage
Having your tools within arm’s reach is incredibly convenient. Add drawers or shelves under the table for storage. Magnetic strips or hooks can also be attached to the sides of the table to keep frequently used tools accessible.
Enhancing Mobility
If you need to move your table around the workshop, consider adding lockable casters to the legs. This will allow you to easily transport the table without compromising its stability when locked.
Improving Work Surface
For the work surface, you might want to use replaceable steel slats. They are durable and can be easily replaced if damaged. Additionally, consider a surface treatment that resists spatter adhesion, making it easier to clean.
Incorporating a Downdraft System
If you’re concerned about fumes and dust, a downdraft system can be integrated into the table. This will help to keep your workspace clean and ensure a healthier environment.
Adding Electrical Outlets
Having power outlets built into your table can be a game-changer. It allows you to plug in grinders, lights, or other tools directly at your workstation.
By considering these customization options, you can build a welding table that not only meets your needs but also makes the welding process more efficient and enjoyable. Remember, the goal is to build a table that works for you and your specific welding projects.
Troubleshooting Common Issues with DIY Welding Tables
Encountering issues while welding can be frustrating. Here are some tips to troubleshoot common problems:
Inconsistent Welds
If you notice your welds are not uniform, check the following:
- Machine Settings: Verify that your welder is set to the correct parameters for the material and thickness.
- Electrode Condition: Ensure your welding electrode is not too large or damaged.
Weak Joints
Weak joints can compromise the integrity of your welds. To strengthen them:
- Clean Surfaces: Make sure the surfaces to be welded are clean and free of contaminants.
- Proper Technique: Use the correct angles and travel speed for the type of weld you’re performing.
By adhering to these troubleshooting tips, you can build a safer welding environment and improve the quality of your work on your DIY welding table.

Maintenance and Care Tips for Your DIY Welding Table
Proper maintenance of your DIY welding table is crucial for ensuring its longevity and functionality. Here are some tips to keep your welding table in top condition:
Regular Cleaning
- Remove Debris: After each use, brush off slag, grinding dust, and metal shavings.
- Spatter Removal: Use a chisel and hammer to remove spatter. For stubborn spatter, an angle grinder with a flat flap disc may be necessary.
Surface Protection
- Waxing: Apply a protective layer of paste wax to resist spatter adhesion and rust.
- Inspection: Check for any signs of wear or damage, especially on the tabletop surface.
Tool Maintenance
- Organize Tools: Keep your tools organized and in good condition.
- Inspect Clamps: Regularly check the clamps and replace them if they show signs of wear.
By following these maintenance steps, you can ensure that your welding table remains a reliable workspace for all your welding projects.
Environmental Considerations in Welding
Welding can have various environmental impacts, but there are ways to minimize them:
Sustainable Practices
- Recycling: Recycle metal scraps and consumables whenever possible.
- Energy Efficiency: Use energy-efficient welding machines to reduce electricity consumption.
Reducing Toxic Emissions
- Fume Extraction: Use a fume extraction system to capture toxic emissions.
- Eco-Friendly Materials: Opt for water-based fluxes or electrode coatings that are less harmful to the environment.
Green Innovations
- Alternative Processes: Consider using welding techniques that produce fewer fumes, such as friction stir welding.
- Virtual Training: Virtual reality is used for training to reduce waste from practice materials.
Adopting these environmentally friendly practices not only helps protect the planet but also can improve the health and safety of the welder. By being mindful of these considerations, welders can contribute to a more sustainable future.
Updates and Innovations in Welding Technology
The welding industry is continuously evolving, with new technologies enhancing the efficiency and quality of welding practices. Here’s an overview of the latest advancements that could be integrated into your DIY welding table to stay ahead of the curve.
Advanced Welding Processes
Innovative welding methods are transforming the way we join materials. These include:
- Magnetic Arc Welding: This process uses magnetic fields to control the arc, providing better stability and penetration.
- Explosive Welding: A technique that joins materials by using a controlled explosion to bond dissimilar metals.
- Ultrasonic Welding: Utilizes high-frequency ultrasonic vibrations to join materials, ideal for thin or delicate parts.
- Friction Stir Welding: A solid-state joining process perfect for aluminum and other non-ferrous alloys, producing high-strength welds with minimal distortion.
- Electron Beam and Laser Welding: Both offer precise control for deep welds and minimal heat-affected zones.
Automation in Welding
Automation is becoming increasingly prevalent in welding, with:
- Robotic Welding: Robots can consistently produce high-quality welds and increase production speed.
- Welding Cobots: Collaborative robots work alongside humans, enhancing safety and efficiency.
- Welding Drones: For hard-to-reach areas, drones equipped with welding gear can perform repairs and inspections.
Tailored Welder Training
With the advent of new technologies, training methods have also advanced:
- Virtual/Augmented Reality Training: These tools offer a hands-on experience without the risks associated with traditional welding, allowing for safe and efficient learning.
Clean and Safe Welding Environments
Efforts to reduce emissions and improve safety are crucial:
- Emission Reduction: New welding technologies aim to minimize the environmental impact by reducing toxic emissions.
By integrating these updates and innovations into your welding practices, you can enhance the capabilities of your DIY welding table and contribute to a safer, more efficient, and environmentally friendly welding environment.
FAQs About DIY Welding Table
Making a DIY welding table can be a rewarding project that adds value to your workshop. Here are some frequently asked questions to guide you through the process.
What Materials Do I Need for a DIY Welding Table?
For a basic welding table, you’ll need:
- Steel Plate: For the tabletop, a thick, flat steel plate is ideal.
- Angle Iron: To build a sturdy frame.
- Tubing: For legs, consider square steel tubing for stability.
- Casters: If you want mobility, heavy-duty casters are a must.
How Thick Should the Tabletop Be?
A thickness of at least 3/8 inch is recommended to handle the heat and weight of welding projects. However, if you plan on working with heavier materials, consider going up to 1/2 inch or more.
Can I Add Storage to My Welding Table?
Yes, adding storage can be very practical. Consider:
- Drawers: For storing small tools and welding accessories.
- Shelves: Underneath the tabletop for larger equipment.
- Hooks: On the sides for hanging clamps and cables.
How Do I Ensure My Welding Table is Level?
Use a precision level during assembly, and adjust the feet or casters to compensate for any unevenness in the floor. A level table is crucial for accurate welding.
What Safety Features Should I Include?
Safety is paramount, so include:
- Grounding Point: To prevent electrical hazards.
- Fireproof Surface: Treat the tabletop to resist spatter.
- Side Guards: To contain sparks and prevent tools from rolling off.
By addressing these FAQs, you can build a functional and durable DIY welding table tailored to your specific needs and safety requirements.
Conclusion:
In conclusion, building a cheap DIY welding table can be a rewarding project, enhancing both your workshop’s functionality and your welding efficiency. By adhering to the design principles, safety guidelines, and step-by-step instructions outlined in this guide, you can build a durable and versatile welding table tailored to your specific needs.
Moreover, incorporating customization options adds a personal touch, making your welding workspace truly your own. Remember, a well-designed welding table is not just a work surface; it’s a cornerstone for quality welding projects. So, gather your materials, and let’s start building a table that meets all your welding demands.


