DIY wood toys are a fun and sustainable way to spark creativity in children. Discover 40 simple and fun DIY wood toys for children to enjoy. Get creative and make your own wooden toys with these easy step-by-step instructions. From cars to puzzles, find fun projects for all skill levels! This piece will delve into the educational benefits of making wooden toys and the necessary tools and methods to begin.
We will also discuss customization ideas to make your creations unique and appealing to kids. Learn how to ensure the safety and sustainability of your DIY wood toys, troubleshoot common issues, and discover tips for maintenance and care. Finally, we have compiled a list of FAQs to address any doubts you may have. Let’s dive in and start making memorable wooden toys for the little ones in your life!
Continue reading to discover easy DIY wood toys that will spark joy and creativity in kids. Let’s embark on this crafting journey together!
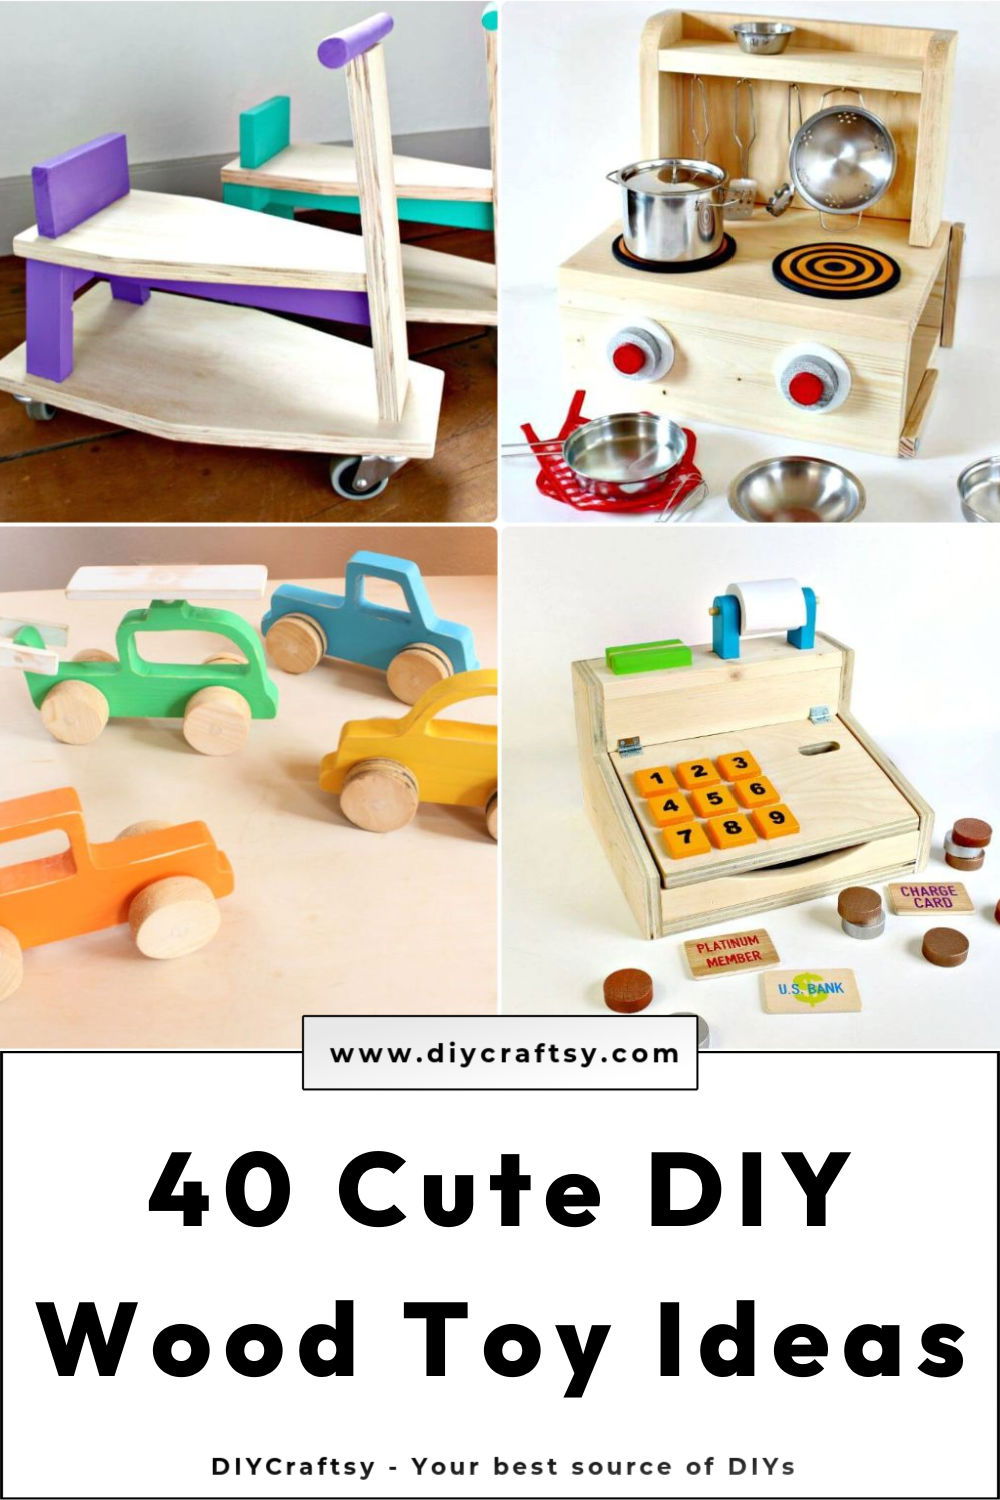
How to Make Wood Toys at Home
Learn how to make wood toys with our step-by-step guide below:
Materials Needed
- Scrap timber or pine
- 19mm dowel for the helicopter skids
- Thinner pine for the helicopter rotors
- 25mm spade bit
- 35mm hole saw for car wheels
- 6mm drill bit
- Jigsaw
- Sandpaper
- Nylon washers
- Wood glue
- Paint (undercoat and colors of choice)
- Speed square
Helicopter
Step 1: Sketch and Cut
Start by drawing the helicopter’s shape on your timber. Carefully cut out the shape using a jigsaw. Smooth the edges with sandpaper.
Step 2: Prepare the Skids and Rotors
Use the 19mm dowel for the skids and the thinner pine for the rotors. Drill 6mm holes in the body for attaching these parts. To ensure the helicopter stands, drill the holes for the skids at a 45-degree angle using your speed square as a guide.
Step 3: Painting
Paint the helicopter parts separately, starting with an undercoat. Choose vibrant colors to make it appealing to children. Allow the paint to dry completely.
Step 4: Assembly
Place nylon washers between the propeller and rotor to ensure they spin freely. Glue the dowels for the skids and the rotor in place. Your helicopter is now ready for imaginary flights!
Race Car
Step 1: Shape and Cut
Use a piece of scrap 50 by 30 dressed pine. Sketch the race car shape, including the driver’s seat which you’ll cut out with a 25mm spade bit. Use a jigsaw for the car’s outline. Drill 6mm holes at the front and back for the axles.
Step 2: Wheels
Use a 35mm hole saw to cut four wheels from a thinner piece of pine. Glue the wheels onto the axles but leave one side unglued for now.
Step 3: Sanding and Painting
After the glue has dried, sand all parts to create a smooth finish. Apply an undercoat and then paint in colors of your choice. Let it dry thoroughly.
Step 4: Final Assembly
Just like with the helicopter, use nylon washers between the wheels and the car body to ensure they roll smoothly. Glue the remaining side of the wheels onto the axles. Your race car is now ready to speed away to fun adventures.
Video Tutorial
For a step-by-step video tutorial on making these delightful wooden toys, watch the Great Home Ideas YouTube video.
It pairs well with this written guide, offering a visual complement to the instructions provided here for an engaging and comprehensive crafting experience.
Educational Value of DIY Wood Toys
DIY wood toys are more than just playthings; they are tools for learning and development. Crafting toys from wood offers a hands-on educational experience that can benefit children in various ways.
Fostering Creativity and Imagination
Wooden toys often come in simple, versatile forms, encouraging children to use their imagination. Unlike electronic toys with predetermined functions, wooden toys can be anything a child dreams up, from a simple block that transforms into a car to a set of shapes that become characters in a story.
Enhancing Cognitive Skills
Building and playing with wooden toys can enhance cognitive skills such as problem-solving and spatial reasoning. For example, assembling a wooden puzzle requires a child to recognize patterns and shapes, which is a fundamental skill in mathematics and logic.
Developing Fine Motor Skills
Working with small pieces and assembling parts helps develop fine motor skills. Activities like stacking, fitting, and balancing all contribute to the refinement of these skills, which are essential for tasks such as writing and tying shoelaces.
Encouraging Physical Interaction
In an age dominated by screens, wooden toys provide a tactile experience that encourages physical interaction. The act of touching, feeling, and manipulating wooden toys can aid a child’s sensory development and hand-eye coordination.
Promoting Concentration and Patience
DIY wood toy projects can teach children the value of concentration and patience. Completing a toy from start to finish requires focus and perseverance, qualities that are beneficial throughout life.
By adding DIY wood toys, adults can give kids an enjoyable educational experience.
Essential Tools and Techniques for Crafting DIY Wood Toys
Crafting DIY wood toys can be a delightful and rewarding hobby. With the right tools and techniques, you can make durable, safe, and cherished playthings that can be enjoyed for generations. Here’s a guide to help you get started on your woodworking journey.
Basic Tools You’ll Need
To begin, you’ll need a few fundamental tools. These are the building blocks of your woodworking toolkit:
- Saw: A hand saw or jigsaw is perfect for cutting wood into the desired shapes.
- Drill: A drill is essential for making holes, whether for axles or decorative purposes.
- Sandpaper: Smooth out rough edges and surfaces to make your toys safe to handle.
- Chisels: For detailed carving and shaping, chisels are your go-to tools.
- Paintbrushes: When it’s time to add color, a good set of paintbrushes will be necessary.
Techniques to Master
Once you have your tools, mastering these techniques will help you make high-quality toys:
- Cutting and Shaping: Learn to cut accurately and shape your wood pieces with precision.
- Sanding: Sanding is crucial for a smooth finish that’s safe for little hands.
- Drilling: Practice drilling straight and clean holes for assembling parts.
- Painting: Develop your painting skills to add vibrant, non-toxic colors to your toys.
Safety First
Always prioritize safety when working with tools and materials:
- Wear Protective Gear: Safety glasses and gloves are a must.
- Work in a Ventilated Area: Especially important when painting or applying finishes.
- Keep a Clean Workspace: A tidy space is a safer space.
Customization Ideas for DIY Wood Toys
Making DIY wood toys is not just about following instructions; it’s about adding your personal touch to make each piece unique. Here are some ideas to inspire customization:
Choose Your Theme
Start by selecting a theme that resonates with you or the child you’re making for. Whether it’s dinosaurs, space, farm animals, or fairy tales, a theme can guide your choice of shapes, colors, and features.
Paint and Color
Bring your toys to life with color! Use child-safe paints to add vibrant hues. Here’s how:
- Base Coat: Apply a base coat to ensure even coloring.
- Details: Use fine brushes for small details like eyes or patterns.
- Sealant: Finish with a non-toxic sealant to protect the paint job.
Add Textures
Textures not only add visual interest but also stimulate tactile exploration. Consider:
- Sanding: Smooth some areas while leaving others rough for contrast.
- Fabric: Glue on felt or fabric pieces for soft sections.
Personalize with Names
Personalizing a toy with a child’s name makes it extra special. You can:
- Burn: Use a wood-burning tool for a rustic look.
- Carve: Carve names with a small chisel.
- Paint: Write names with a paint pen for a pop of color.
Mix and Match Parts
Encourage creativity by making toys with interchangeable parts. Make sets of limbs, heads, or wheels that can be swapped to make new toy variations.
Incorporate Movement
Toys that move are always a hit. Add elements like:
- Wheels: Attach wheels for rolling toys.
- Hinges: Use hinges for parts that need to fold or bend.
- Elastic: Add elastic to make stretchable or bouncy parts.
Ensuring Safety and Sustainability in DIY Wood Toys
When crafting DIY wood toys, safety and sustainability are paramount. Here’s how to ensure your creations are both safe for children and kind to the environment.
Selecting Safe and Sustainable Materials
Choose the right wood: Opt for sustainable sources like FSC-certified wood. Avoid woods treated with chemicals or paints that could be harmful to children.
Non-toxic finishes: Always use finishes that are safe for children’s toys. Look for products labeled as non-toxic or food-safe.
Crafting with Care
Smooth edges: Sand down any sharp edges or corners to prevent splinters and injuries.
Sturdy construction: Ensure all parts are securely attached to avoid choking hazards.
Regular inspections: Check the toys frequently for any signs of wear or damage.
Troubleshooting Common Issues in DIY Wood Toys
Even with the best care, wooden toys can encounter issues. Here’s how to address some common problems.
Fixing Loose Joints
Glue it right: Use a strong wood adhesive for repairs. Clean the area, apply glue, and clamp until dry.
Dealing with Splinters
Sand away: Use fine-grit sandpaper to smooth out rough areas. Finish with a non-toxic sealant to protect the wood.
Refreshing Faded Paint
Repaint safely: Use child-safe paints to touch up toys. Apply thinly and evenly, allowing ample drying time.
Maintenance and Care for DIY Wood Toys
Proper maintenance and care are essential to ensure that your DIY wood toys last for years, providing joy and learning opportunities for children. Here’s a guide to keeping your wooden toys in great condition.
Cleaning and Handling
Gentle Cleaning: Use a damp cloth to wipe the surface clean. Avoid soaking the toys in water, as this can damage the wood.
Dry Properly: After cleaning, allow the toys to air dry. Do not expose them to direct sunlight or high temperatures, which can cause warping.
Regular Maintenance
Inspect Regularly: Check the toys often for any signs of wear or damage. Look for loose parts, splinters, or chipped paint.
Tighten Joints: If any parts become loose, tighten them securely. Use a strong wood adhesive if necessary.
Long-Term Care
Storage: Keep the toys in a dry, airy place away from humidity to prevent mold and mildew growth.
Wood Treatment: Occasionally, you may oil or wax the wood to maintain its natural beauty and prevent drying out.
FAQs About DIY Wood Toys
When it comes to making DIY wood toys, there are many questions that both beginners and experienced crafters may have. Here are some of the most frequently asked questions to help guide you through the process of making your own wooden toys.
What is the best type of wood to use for making toys?
The best type of wood for making toys is typically a hardwood such as maple, beech, or birch. These woods are durable and less likely to splinter, making them safer for children’s toys.
Are there any safety concerns I should be aware of?
Yes, always ensure that the wood is sanded smooth to prevent splinters, use non-toxic finishes, and avoid small parts that could be a choking hazard for young children.
Do I need advanced woodworking tools to start making wood toys?
No, you can start with basic tools like a saw, drill, sandpaper, and chisels. As you gain more experience, you may want to invest in more advanced tools.
How can I add color to my wood toys?
You can use child-safe paints or stains to add color to your wood toys. Make sure any finishes you use are non-toxic and safe for children.
Can I make wood toys that are suitable for toddlers?
Yes, you can make wood toys for toddlers, but ensure they are large enough not to be a choking hazard and that they have no sharp edges or small parts.
How do I make sure the toys are durable?
To ensure durability, use high-quality wood, strong joinery techniques, and apply a protective finish to the toy to withstand playtime wear and tear.
What are some simple wood toy projects for beginners?
Some simple projects include making blocks, cars, puzzles, and simple animal figures. These projects require minimal tools and are great for learning the basics.
How can I personalize the wood toys I make?
You can personalize toys by adding the child’s name, using their favorite colors, or customizing the design to match their interests.
How do I maintain and care for wood toys?
To maintain wood toys, clean them with a damp cloth and avoid soaking them in water. Periodically check for any damage and make repairs as needed.
Where can I find inspiration and ideas for wood toy projects?
You can find inspiration from online communities, woodworking books, or by taking a traditional toy and adding your own creative twist.
40 Easy DIY Wood Toys to Make for Kids
Discover 40 fun and simple DIY wood toy projects for kids. Get creative and start crafting your own wooden toys today!
1. DIY Retro TV Style iPad Holder
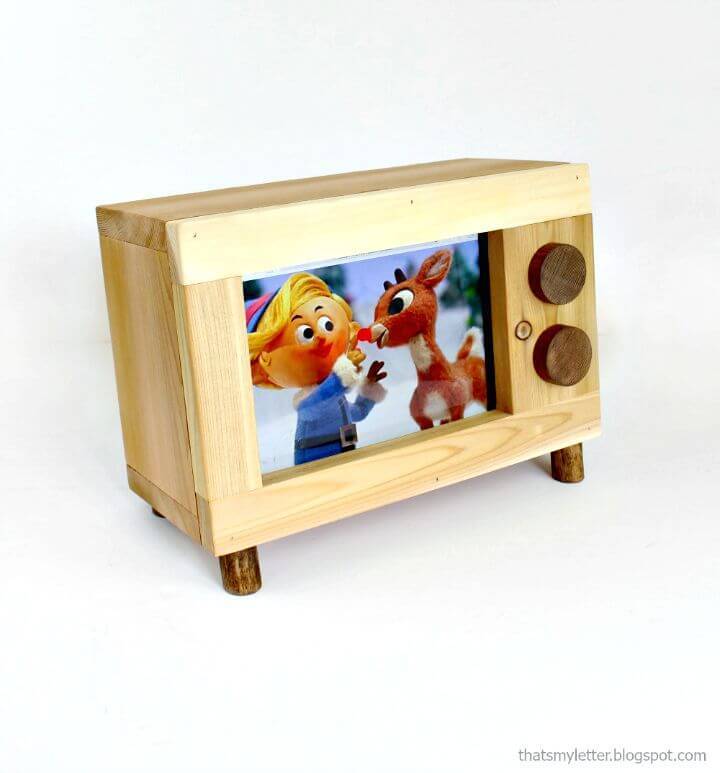
Unleash your creativity by crafting this DIY tablet or iPad holder inspired by the charming aesthetic of retro televisions. Ideal for kids, this project is a fascinating fusion of fun and functionality, and it can be completed in just thirty minutes.
It’s constructed from common materials like 1×6, 1×2, and 1×4 boards, as well as some scrap dowel pieces, which you may already have in your scrap wood pile. You can modify the size to fit any tablet or iPad model.
Offering a delightful blend of nostalgia and modern technology, this iPad holder securely houses your device and adds a quirky touch to any room. Spark joy by constructing this adorable, portable, and genuinely useful iPad holder today. ana white
2. How to Build Wooden Scooters for Toddlers
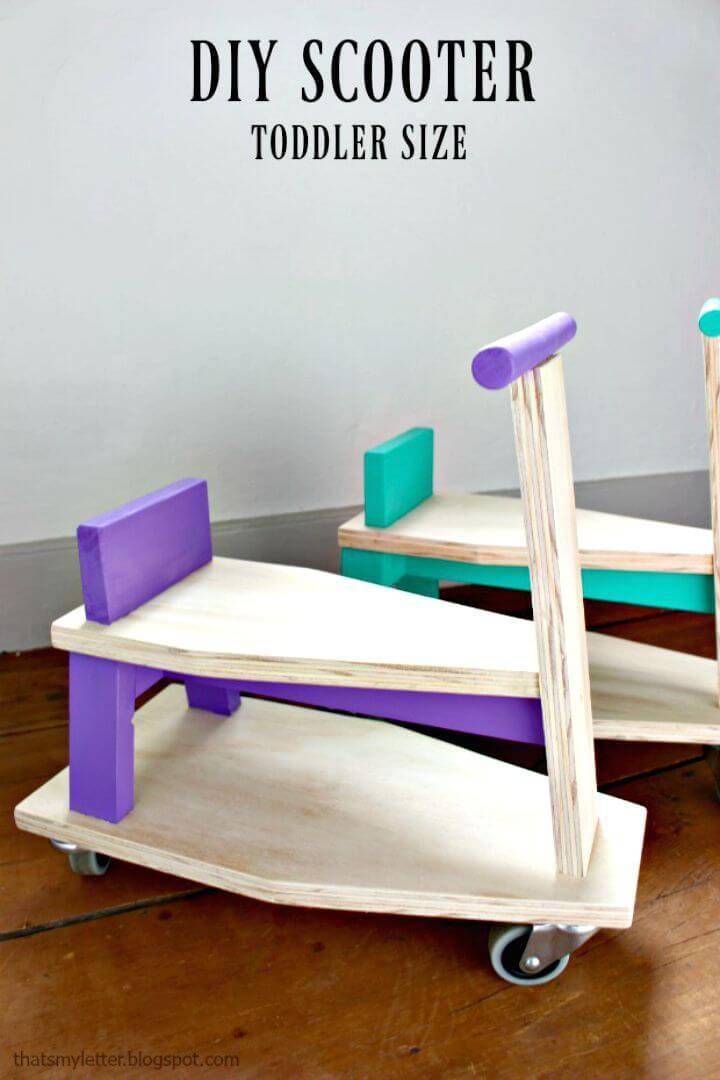
Spark joy in a child’s life with a DIY wooden scooter ride-on, an amazing project that utilizes scrap wood creatively. Ideal for children between 14 months and three years old, this DIY wonder can double as a push toy, making it perfect for indoor use.
Equipped with just a handful of construction screws and some paint, you can build this enchanting ride-on that promises hours of fun for your little one. It’s not just about building a toy but about making lasting memories.
Don’t miss the chance to craft this charming gift for a little one, all while making good use of leftover materials. Who knew you could transform scrap wood into a child’s new favorite toy? So, gather your tools and start building this charming wooden scooter ride-on! jaimecostiglio
3. How to Make a Tabletop Play Kitchen
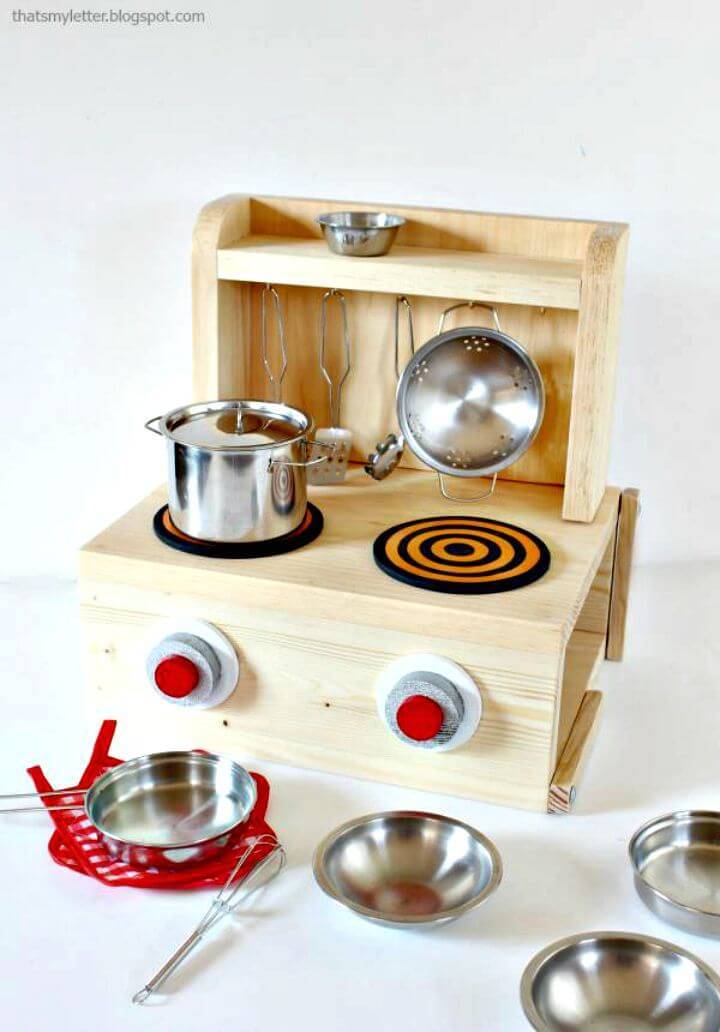
Let your little one’s imagination run wild with their DIY play kitchen – the perfect place to cook up a storm! It is a compact tabletop play kitchen that can be stowed away conveniently. Built with 1x4s, 1x3s, and a piece of 1/2″ plywood, this mini kitchen is an excellent project to hone your woodworking skills while constructing something delightful for your little ones.
It includes a small cabinet for hanging utensils and storing toys after playtime. This project encourages imaginative play and promotes organization, as it fits neatly into itself.
With the straightforward instructions in this guide, you can easily construct this charming play kitchen that serves fun and function. So, why wait? Get started on this creative venture today and add a whimsical touch to your home. ana white
4. DIY Wood Cash Register
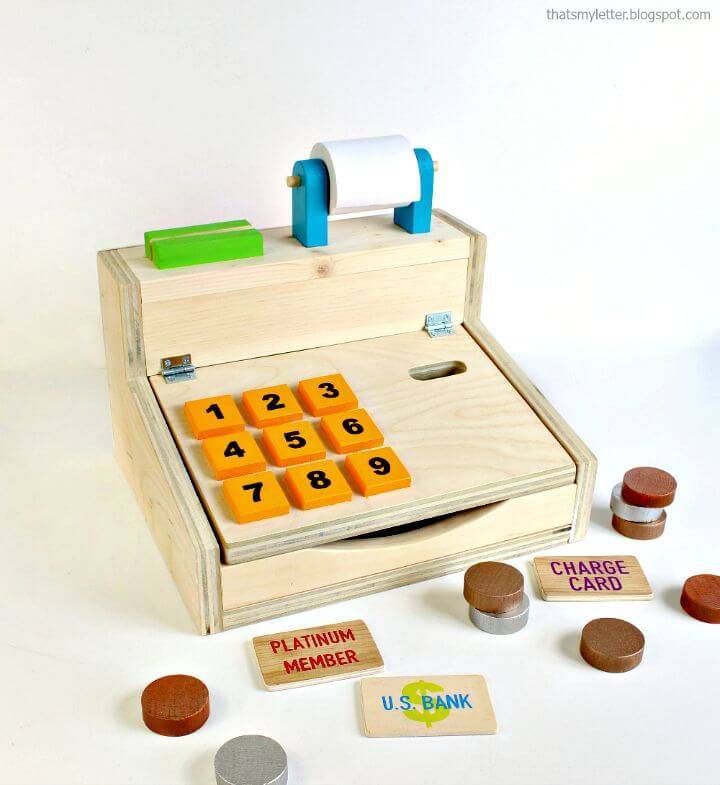
Build your cash register with this easy-to-follow DIY wood plan – a great way to ensure your business is up for triumph! This wooden toy is easy to build and customizable, perfect as a handmade holiday gift. Sporting a simple hinge top, this project is designed to be friendly with your scrap wood pile.
Main materials include 1x boards, plywood, and dowel pieces for the toy coins, credit cards, and cash. Follow straightforward steps to bring this project to life, from marking the side profiles to attaching the top with small hinges.
An engaging and purposeful way to recycle leftover wood, this project offers a fun and creative outlet for both young and old. Try it today and build a unique keepsake for the holidays. ana white
5. Make Your Own Wood Toy Camera
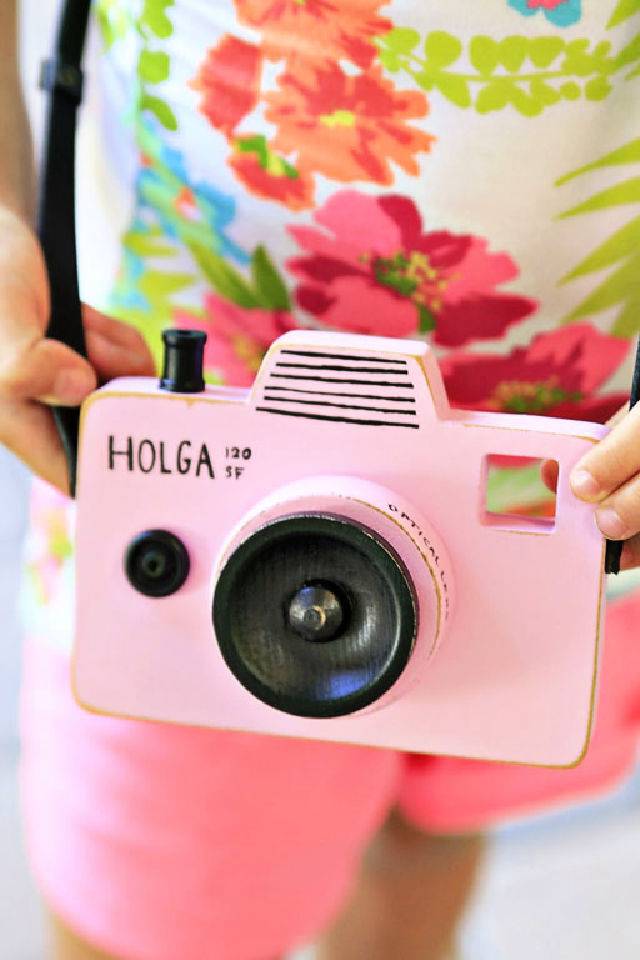
Capture the magic of photography with this charming DIY wooden pretend camera, perfect for your little explorer. Built from a single piece of scrap wood, the project involves shaping the camera body with a compact scroll saw, such as the Dremel Moto-Saw.
The viewfinder is carved out with precision, and the camera details, including the lens and knobs, are created from spare craft wood pieces. Painted pink with black accents, this camera is a visual delight.
Adding a real leather strap ups the authenticity, and the finished product can serve as a fun toy, an interesting photo prop, or a unique decor piece. With a clear varnish finish, the camera is ready for countless adventures. This project truly showcases the power of creativity and the joy of DIY craftsmanship. lilblueboo
6. Handmade Texture Blocks
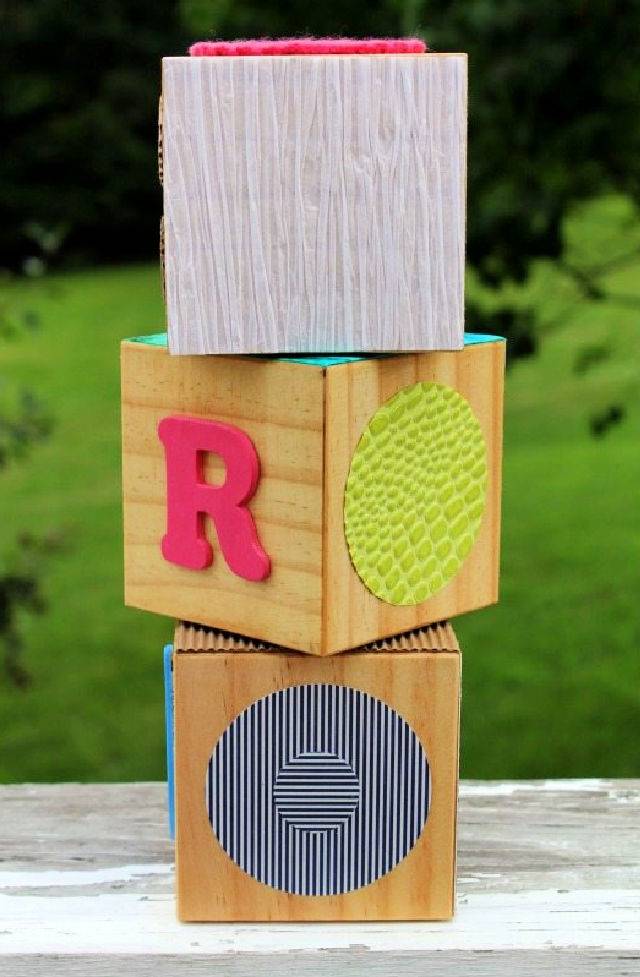
Welcome to the world of handmade texture blocks, a unique sensory play tool designed to stimulate your baby’s cognitive development. Made with love and careful attention, these DIY pine wooden blocks come alive with various fabrics, woods, and papers, offering a tactile exploration experience akin to touch-and-feel books.
The blocks serve a dual purpose; while they entertain your baby, they also strengthen neural pathways vital for all types of learning.
Personalized with elements such as a nursery theme or the child’s initials, these blocks can turn into cherished keepsakes. Unleash your creativity today and witness your baby’s delight as they explore the world with their hands. firefliesandmud
7. DIY Toy Paddle Boat
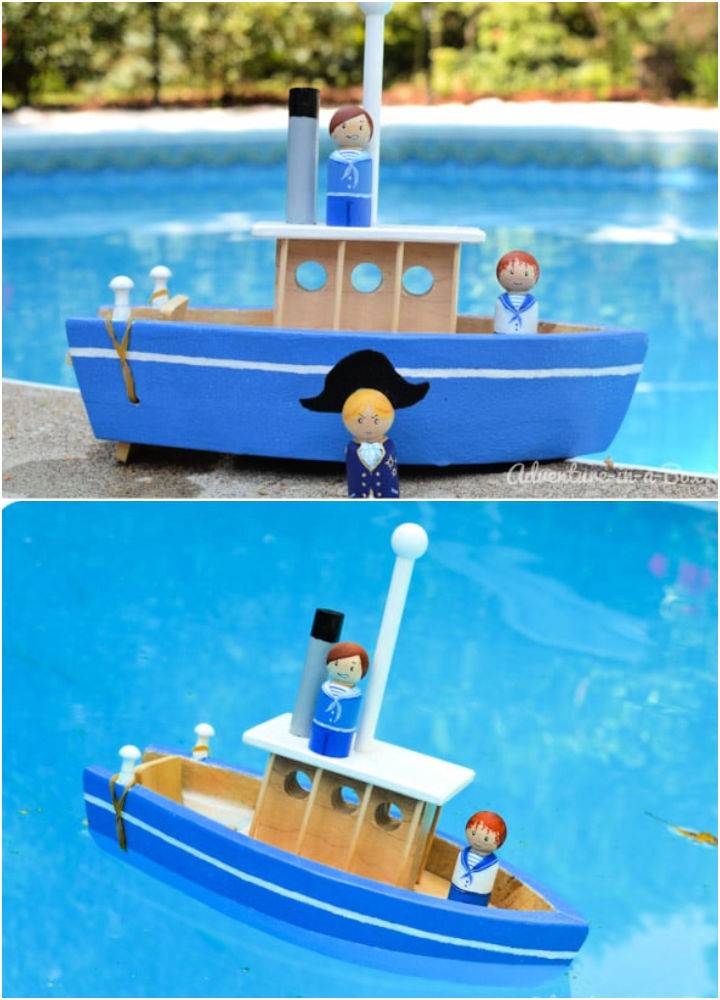
Introduce your little one to the captivating sailing world with a DIY wooden paddle boat! This engaging project lets you and your child explore movement mechanics while making a unique toy. Made from wood, the paddle boat has a special mechanism that propels it forward, providing entertainment and a hands-on educational experience.
This paddle boat can be a great companion for your child during summer outings, promising endless adventures on the Great Lakes or even in a neighbor’s pool.
This project offers a fun activity and an opportunity to learn about motion mechanics, making it a great blend of education and playtime. So why wait? Set sail on this exciting DIY project today! adventure box
8. Balloon-Powered Wooden Toy Boat
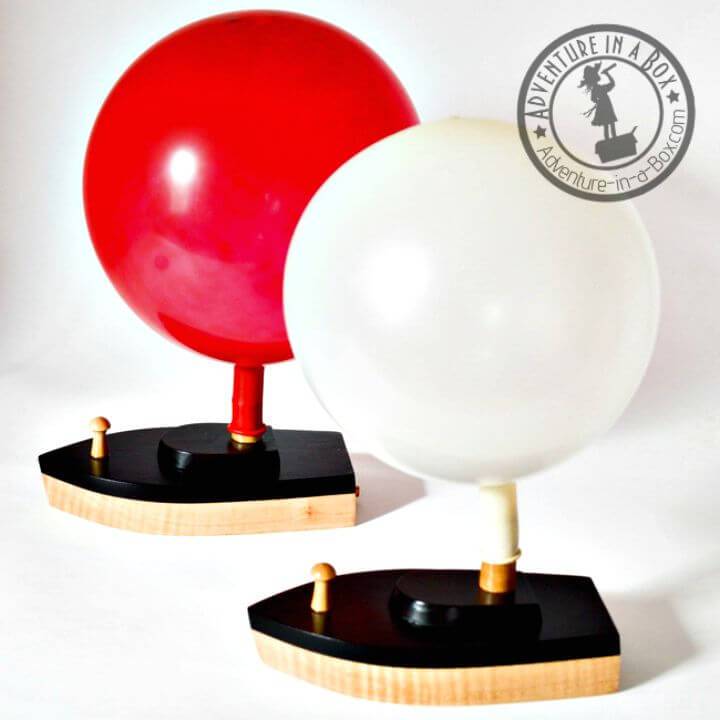
Sail into an adventure of learning and playing with the excitement of a homemade balloon-powered boat. Enthralling to children and adults alike, these boats offer a fun-filled exploration of science and mechanics. You can transform the supplied ingredients into a playful experiment in your bathtub with a step-by-step guide.
With this boat, you will ignite an adventurous spirit and foster a deeper understanding of mechanical systems, bringing a perfect blend of science and fun to your home. Ready to embark on this journey? Build your balloon-powered boat today and turn your bathtub into a fascinating world of exploration. adventure in a box
9. DIY Wooden Dream Dollhouse
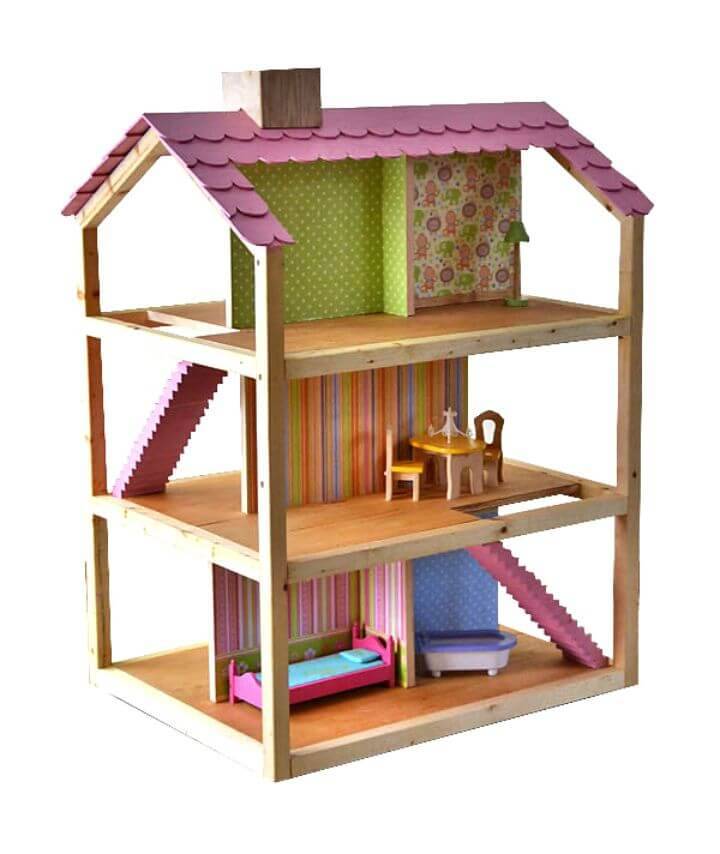
Get ready to witness the joy in your child’s eyes when they play with a beautiful DIY three-story dollhouse specially designed for 12″ dolls. It’s a unique project with a DIY twist. It is meticulously constructed from soy-based plywood and finished with non-toxic linseed oil, making it eco-friendly and sturdy.
The dollhouse stands strong enough for kids to play with and will be a lasting part of their childhood memories. Simple yet stylish, it comes with attractive decoupaged scrapbooking paper for each room and a meticulously crafted stairway.
The assembly is easy with 3/4″ PureBond Plywood, pine 2x2s, linseed oil, pink paint for accessories, and other common materials. This dollhouse is bound to keep children engaged for hours, perfect for children’s creativity and imagination. Plus, it can double up as a bookshelf later on, making it a smart addition to your home! ana white
10. Cute DIY Wooden Robot Buddy
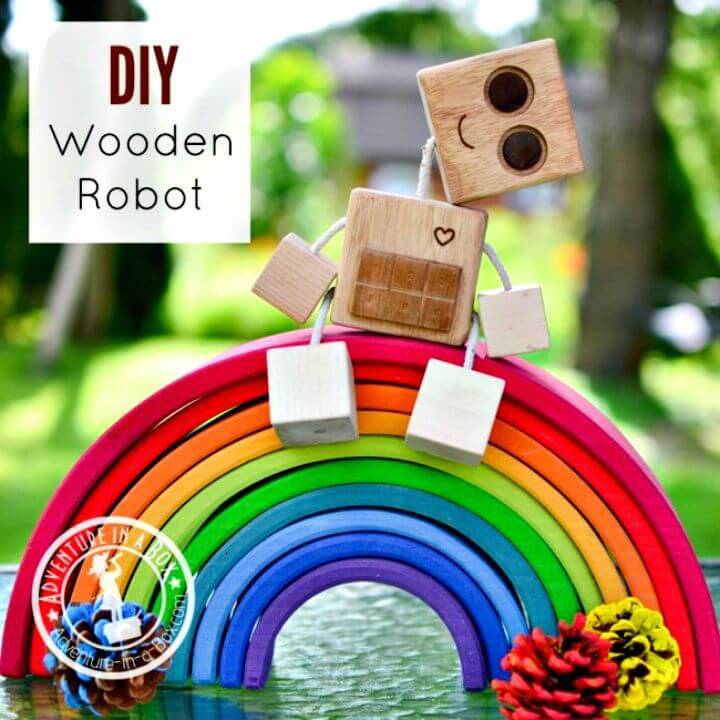
DIY wooden toys are a wonderful craft activity that you can enjoy with your family and friends. Transform your child’s playtime into a creative adventure with this DIY wooden robot toy! This heartfelt project transforms everyday wooden blocks into a lovable companion your child can cherish. This project is an opportunity to introduce kids to woodworking, fostering hands-on skills and creativity.
Made from natural materials, it offers a safe and eco-friendly play option, resilient to child’s play and even teething. A DIY wood robot toy isn’t just a plaything; it’s an enduring symbol of love, waiting to be welcomed into your child’s heart and hands.
It might become their newest best friend, awakening a morning with surprise and ending a day with a jiggly dance of joy. Start crafting today and make lasting memories for your child. adventure box
11. DIY 2×4 Jig Saw Wood Block Animals
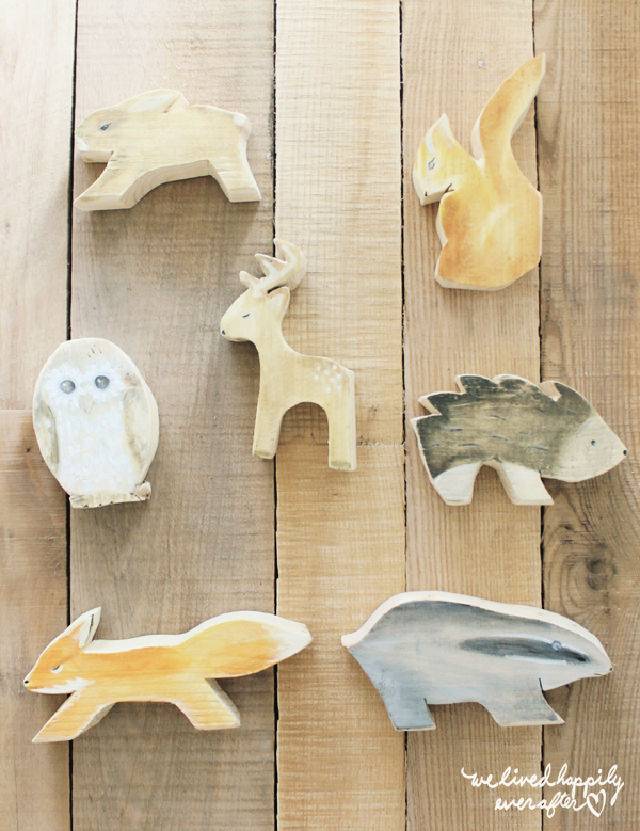
Diy wood toys are not only fun to play with, but also help develop your child’s creativity and skills. Dive into the world of DIY creativity with this latest guide on making 2×4 jigsaw woodblock animals. You can craft charming wooden animal blocks with artistic flair and simple materials such as a 2×4 board, a jig saw, and acrylic paints. This fun project lets you repurpose unused 2×4 scraps into unique, eco-friendly toys that your children will adore.
The process starts with tracing animal silhouettes onto your 2×4 board, which are then carefully cut out using a jig saw. Post-cutting, these wooden blocks are given a smooth finish using sandpaper before being painted.
Noteworthy is the detailed use of shades and the incorporation of consistent colors across animals, which gives these toys a harmonious feel. Engage in this exciting project and transform your leftover 2×4 boards into a delightful menagerie today! happilyeverafter
12. How to Make Mirror Wooden Blocks – – DIY Wood Toys
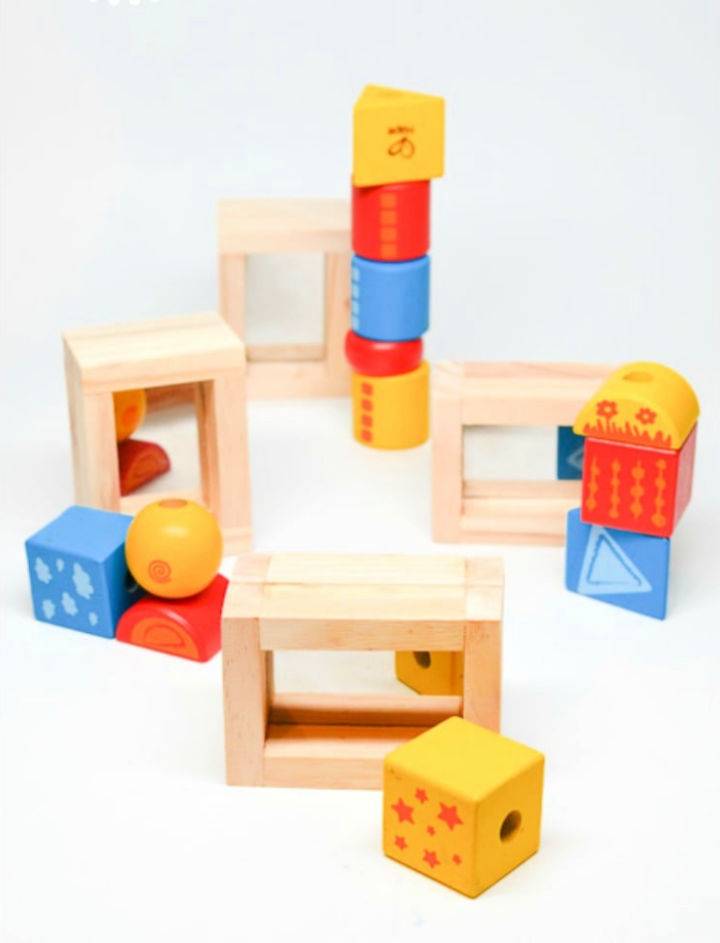
Make your personalized mirror blocks to add a unique twist to your child’s playtime with this DIY guide! Derived from an affordable project, these blocks deliver both fun and learning experiences. They are made from simple supplies such as a tumbling tower game, mirrored sheets, and wood glue.
This easy-to-follow process involves assembling wooden blocks into rectangular frames and inserting mirror sheets. Each homemade block costs under seven dollars – a steal compared to store-bought options.
These blocks enhance the playful environment and foster creativity, offering a mesmerizing play experience. Ideal as a handmade Christmas gift, these mirror blocks will surely be a hit among the young ones. adventure
13. How to Do Modular Stackable Dollhouse
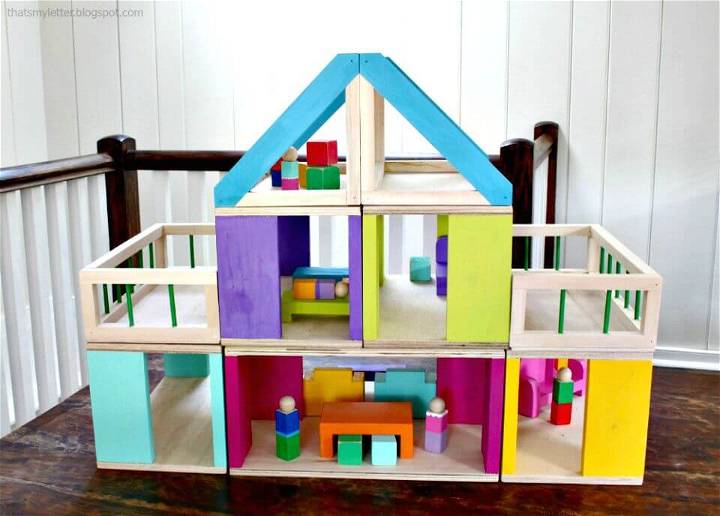
Spark joy and creativity in your little ones with this DIY dollhouse! An ideal project for beginner crafters, this customizable dollhouse consists of individual rooms that stack, allowing kids to make their very own unique playset. This do-it-yourself project calls for easily accessible materials like 1/2″ plywood, 3/4″ molding, and 1×4 boards, with an estimated project time of a few hours, making it excellent for a fun-filled weekend activity.
This innovative dollhouse design is a fabulous and interactive way to engage children, enhancing their spatial skills while encouraging imaginative play. Start today and watch your child’s creativity take flight in their personalized dollhouse! ana white
14. DIY Natural Wooden Blocks for Children
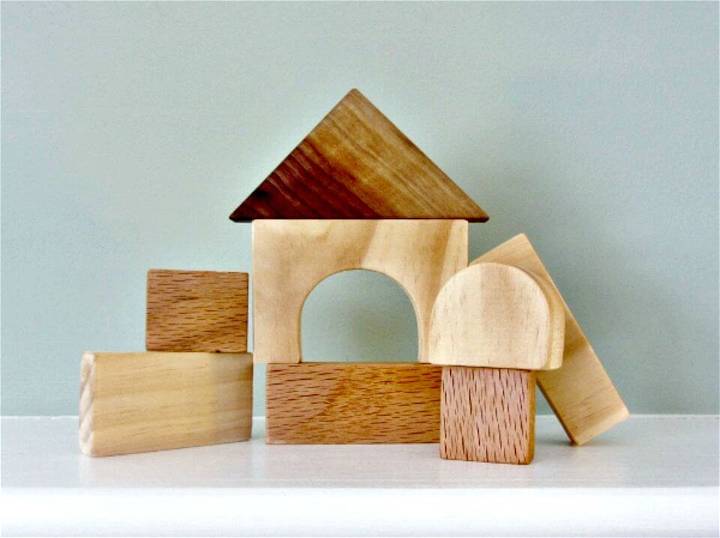
Embark on a fun and engaging DIY journey to craft your natural wooden blocks! This tutorial helps you cultivate basic woodworking skills while making an enduring gift for children, using simple tools like a scroll saw or band saw and materials such as timber of various lengths.
Prioritize safety with eyewear and full attention to your task as you draw, cut, and sand your blocks into various shapes and sizes. Next, add a child-safe finish using non-toxic oil or paint to enhance the blocks’ visual appeal. The result is a unique set of wooden building blocks, a memorable hands-on experience, and a keepsake to be cherished for years. crafts.tutsplus
15. Painted Wooden Toy Bowling Set
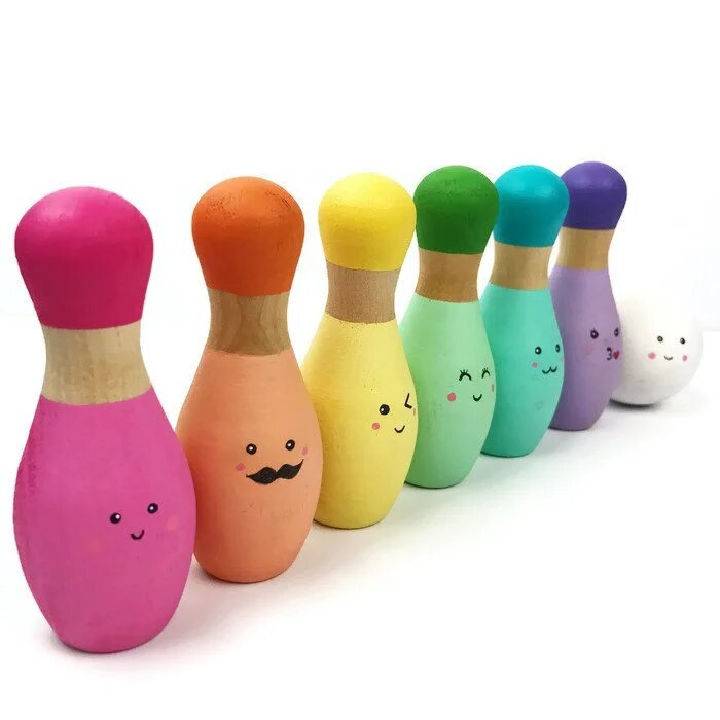
You don’t need to be a carpenter to make diy wooden toys. All you need are some basic tools and a bit of imagination. Revitalize traditional playtime with this DIY-painted wooden bowling set. These handmade wooden toys are a fun and charming project that will evoke nostalgia while making new memories. The essential materials include an unfinished wooden bowling set, acrylic paint, dotting tools or paint brushes, washi tape, and a sealant.
The process involves painting stripes and adorable faces onto the pins, achieving a delightful kawaii effect that kids will adore. Moreover, this toy set is a unique and creative gift for special occasions and birthdays. Make this beautiful bowling pin set and watch it become the star of any party. colormadehappy
16. Personalized Name Puzzle Tutorial
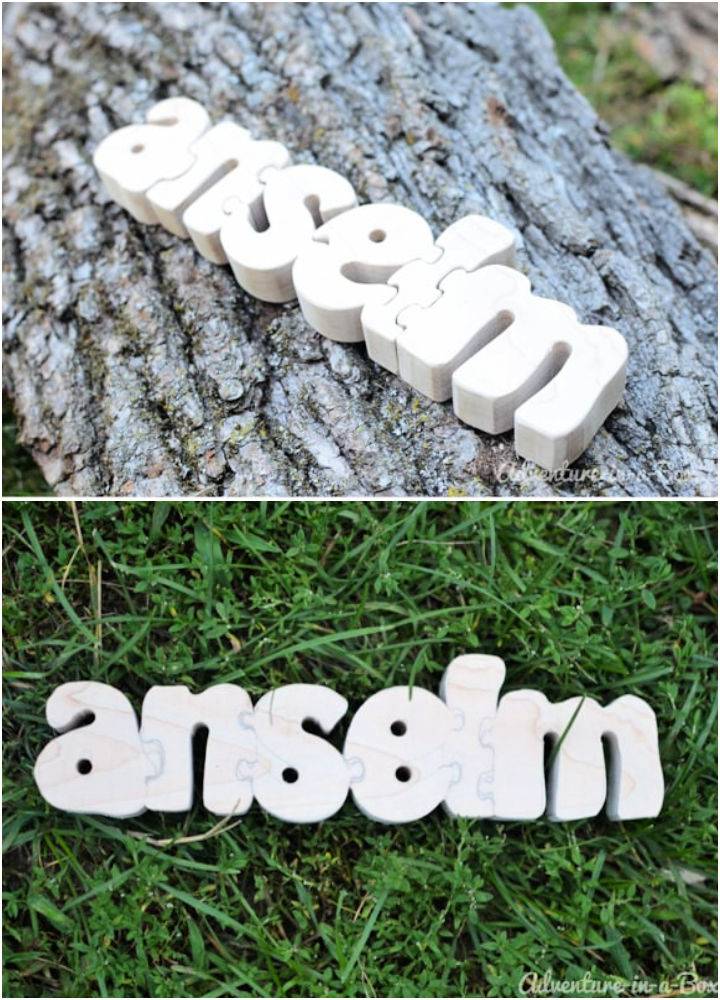
Embrace a personalized playtime experience with a DIY name puzzle! This unique project brings a charming, interactive twist to traditional jigsaw puzzles. Designed to engage young minds, it encourages early letter recognition and fosters fine motor skills. Using a scroll saw or fretsaw, transform a simple piece of wood or cardboard into an educational toy.
This project serves multiple purposes, from an enchanting nursery decoration to an exclusive baby shower gift. It’s time to dive into this creative activity, allowing your child to develop literacy while playing. Make a name puzzle today, making learning fun and engaging for your little ones. adventure in box
17. DIY Wood Push Car, Truck, and Helicopter Toys
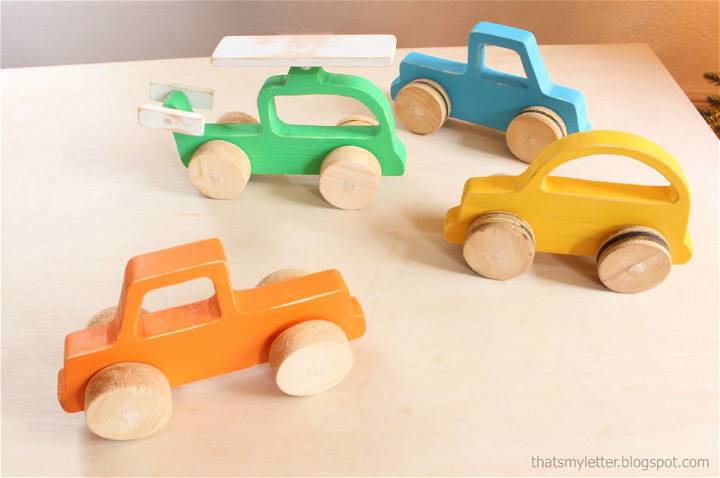
From cars to puzzles, discover the best diy wood toys you can make at home with simple tools and materials. Engage in the creative joy of crafting homemade wooden toy vehicles designed for beginner-level DIY enthusiasts! This innovative project guides you in making charming push cars, trucks, and helicopters from 1×4 scrap wood. Using materials such as wood dowels, hole saw bits, and store-bought wheels, these adorable playthings come to life, offering personalized gifts for the special youngsters in your life.
The process is thoroughly broken down into manageable steps, ensuring a smooth, rewarding crafting experience. Relish in the fulfillment of making functional, timeless toys from readily available or recyclable materials. So, gather your scraps, don your crafting gear, and embark on a delightful journey into the world of DIY wooden toys today! anawhite
18. How to Make Wooden Flower Stacker
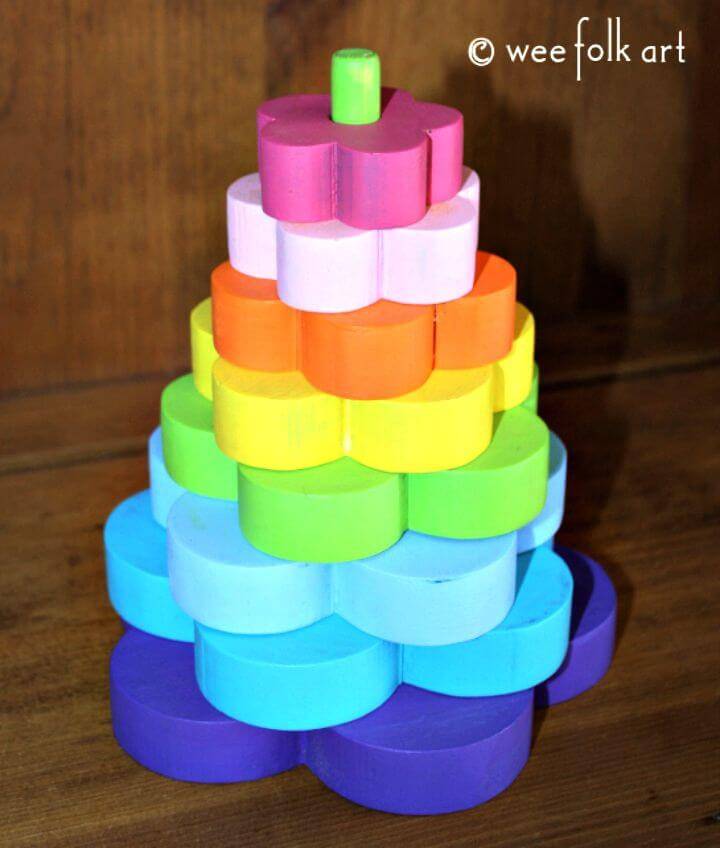
Immerse yourself in the hands-on experience of making a charming DIY wooden flower stacker, a wonderful blend of fun and education for your little ones. Though this task calls for more precision due to numerous curves, the result—a not-so-perfect yet beautifully engaging stacker—is truly worth it.
Using tools like a scroll saw, an electric drill, and the right safety equipment, you’ll have an incredible journey of crafting each flower step-by-step, improving your woodworking skills.
The stacking toy cultivates skill, agility, and hand-eye coordination and enhances children’s sorting, sequencing, and color recognition skills. So, embrace this fulfilling endeavor and witness your effort transform into a cherished toy. weefolkart
19. DIY Wooden Roads and Ramps for Toy Cars
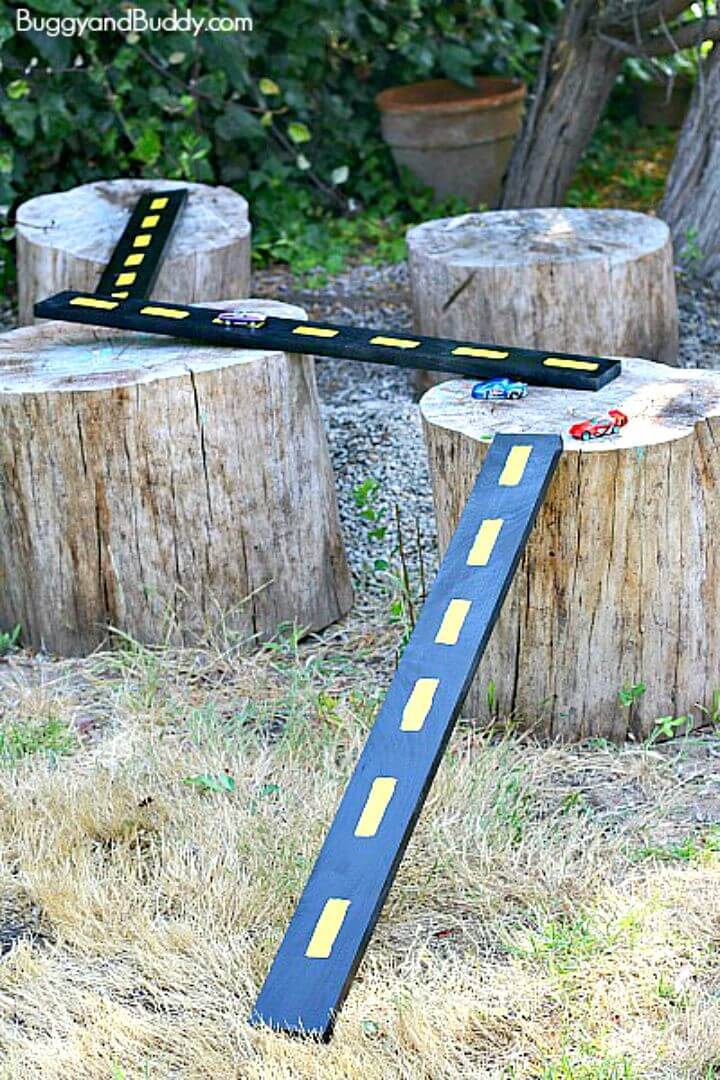
Find out how to turn ordinary wood into amazing diy wood toys with these step-by-step tutorials and tips. Enrich your child’s playtime with homemade wooden roads and ramps for toy cars! This DIY project is not only cost-effective but also offers limitless play options. Made from 36in x 3.5in x 3/4in poplar boards, painted with black and optional yellow paints, these car tracks are perfect for indoor and outdoor play.
The magnificence of this project is in its simplicity and versatility – kids can arrange the boards in numerous formations, making their road networks or daring ramps for an enhanced play experience. Encourage your child’s creativity and motor skills today with this easy-to-make wooden toy car roads and ramps project! buggyandbuddy
20. Waldorf Square Geometric 3D Wooden Puzzle Blocks
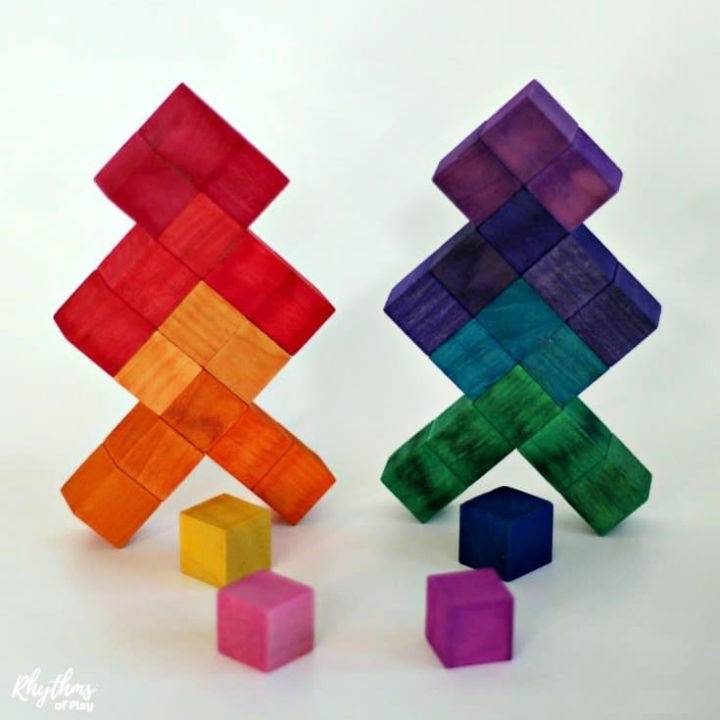
Experience the joy of crafting your own Waldorf square geometric puzzle, a charming DIY toy that stimulates young minds and promotes geometric and spatial learning. Using wooden blocks and liquid watercolor paints, this 3D wooden puzzle will entertain kids for hours while simultaneously encouraging their creativity.
Transform simple wooden blocks into a visually appealing, interactive toy that doubles as energetic building blocks or a challenging puzzle. The toy is perfect for promoting STEAM education, keeping children engaged in a fun and productive way.
It’s a great addition to a home and an ideal gift that keeps on giving. Craft your puzzle today and discover the endless possibilities of shapes, colors, and patterns it presents! rhythmsofplay
21. Make a Puppet Theatre
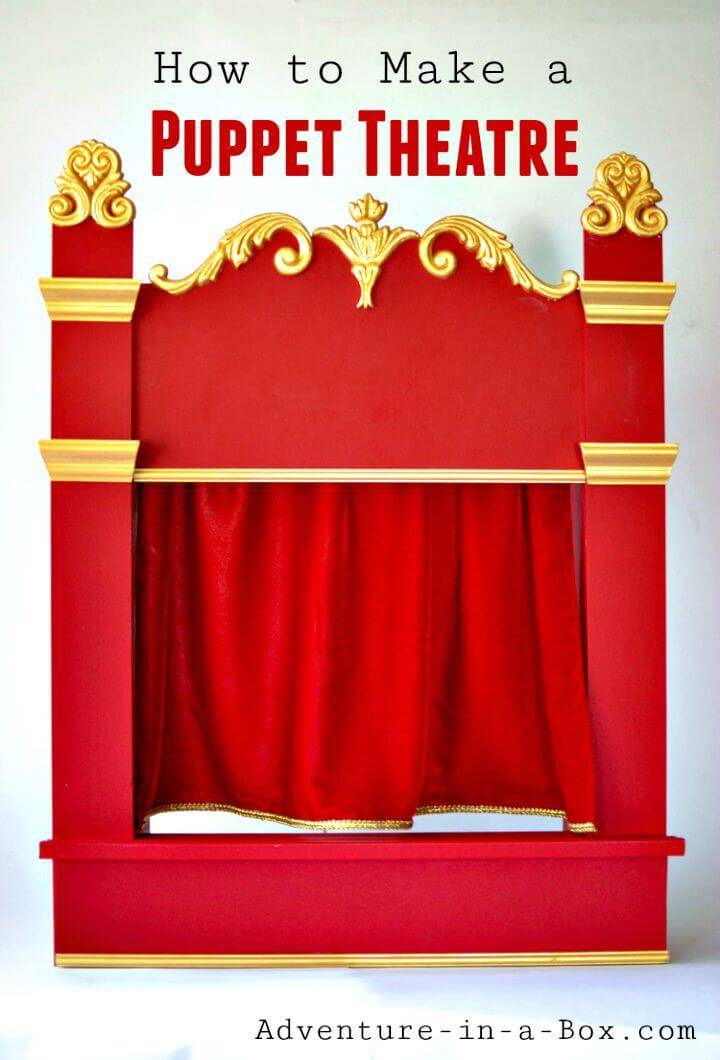
Discover the joy of puppetry at home or in the classroom with this detailed DIY tutorial. Learn how to build a robust puppet theatre using plywood, baseboard molding, wooden decorative moldings, and paint. Designed for longevity, this puppet theatre promises to engage kids, sparking their creativity while teaching them valuable skills like story-writing and puppet-making.
Customize this theatre with accent colors and even add a curtain for a theatrical effect. From shadow puppetry for infants to staging beloved fairy tales for older children, this versatile creation is bound to inspire endless fun. Start your puppet theatre project today! adventure
22. How to Build a Dollhouse at Home
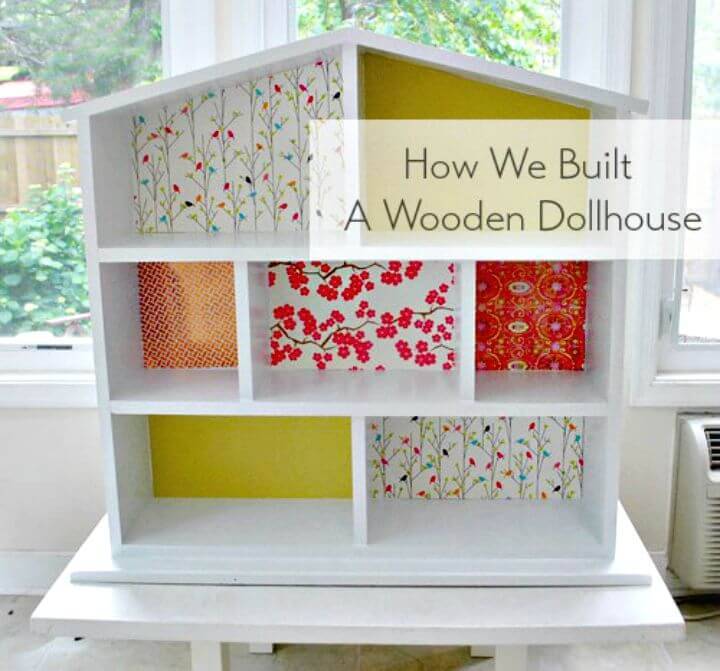
Unveil the exciting world of DIY dollhouses, a fun and rewarding project that brings out the craftsman in you. The project begins with a simple yet robust design featuring a three-story structure with seven rooms made from affordable and light yet sturdy, 1×8″ basic white wood.
The building process takes you on a journey through assembling walls, designing floors, and finally putting up a sloped roof to give it that homely appeal. The dollhouse construction offers an entertaining space that shows that scale can be surpassed for functionality and ease of play.
As for the cost, the entire building material set, majorly wood, is a moderate $35. Join us as we take a fascinating DIY journey that ends up in a charming abode for your child’s dolls. younghouselove
23. Handmade Balance Board
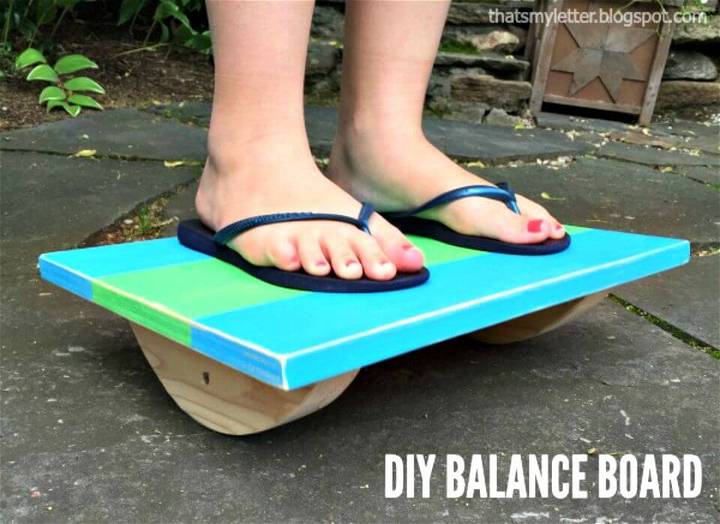
Greet the summer season and transform your backyard into a playground for your children with this unique DIY balance board. This easy-to-make, interactive balance board made from scrap wood offers a thrilling challenge for kids, providing an exciting outdoor activity.
Made with 2×4 and 2×3 wood pieces for stability, along with ¾” plywood for the board’s surface, this balance board is a fun and creative solution for keeping children active and entertained during the summer months.
Follow the simple steps to make this creative play. Customize with vibrant paint colors or intriguing designs to make it appealing. Use this balance board on a rug or carpeted surface for optimal safety. jaimecostiglio
24. How to Make Kids Scooter
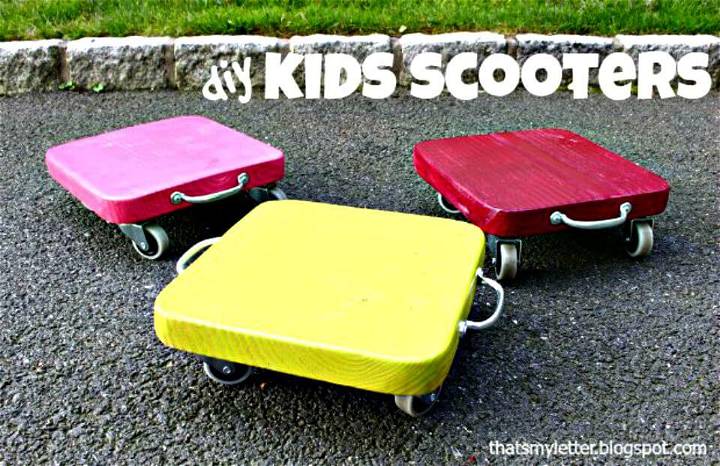
Diy wood toys are a great way to reuse scrap wood and make unique and eco-friendly gifts. Engage yourself in an exciting DIY project this summer by making a wooden balance board for your kids! Made from scrap wood, this engaging activity keeps your little ones active, fostering their balance and motor skills. Featuring vibrant colors and intriguing designs, these boards turn into a captivating attraction.
The construction involves 2×4 and 2×3 wood, ¾” plywood, wood glue, and wood screws. Following this easy guide, you’ll carve a rocker shape, attach the rockers to the center support, and adhere the setup to the plywood top.
Safety comes first – using these balance boards outside or on carpeted surfaces is best. Let your creativity shine, and your kids delight in the unique balance challenge you’ve made! prettyhandygirl
25. Make a Viking Play Tent
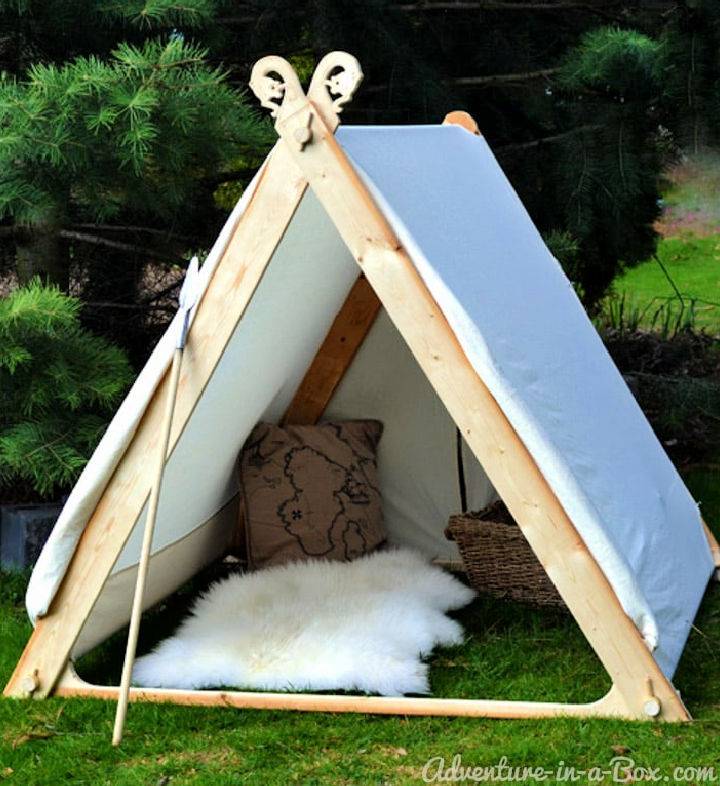
Familiarize your child with the joy of adventure and imaginative play with this authentic DIY Viking tent. A project that transforms a common play area into a world of endless exploration can serve as anything from a bear’s den to an Inuit igloo. It is durable and easy to assemble, constructed from pine boards, dowels, and undyed cotton fabric.
This unique Viking tent features intriguing dragon head carvings and doesn’t require nails for assembly. For those looking to protect their creation from the elements, advice is provided for applying tent sealant and outdoor varnish.
The result is a stunning historical tent that serves multiple purposes and offers countless opportunities for creative play. It also offers a learning experience about Viking culture, making it an exciting and educational project. adventure box
26. Easy DIY Chalkboard City Blocks
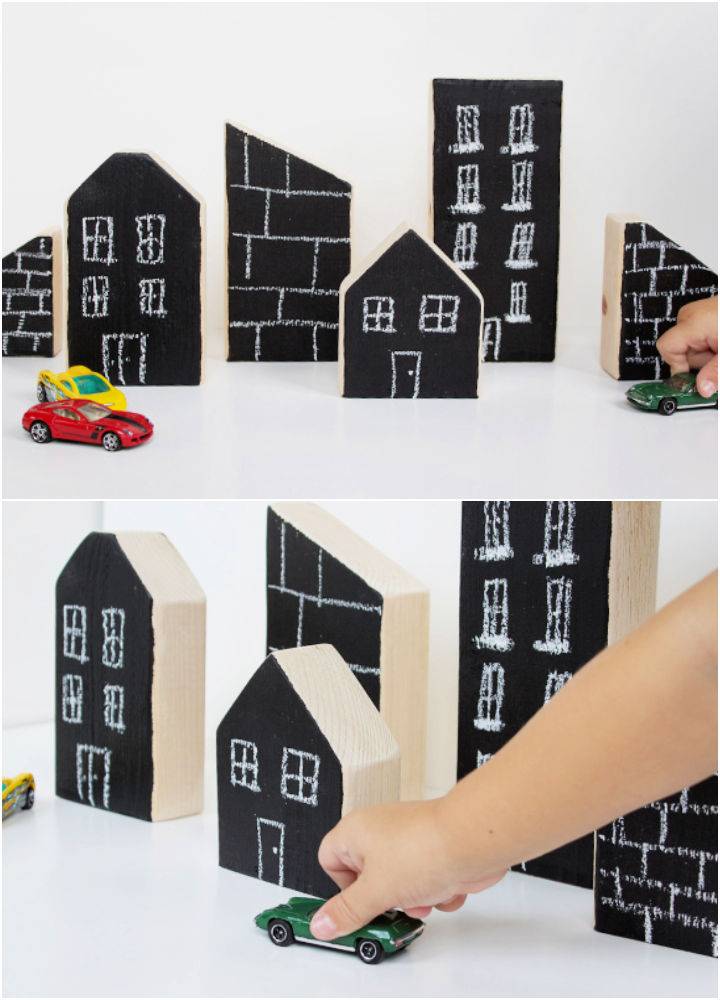
Let your imagination run stormy as you make an entire city with the power of DIY chalkboard city blocks! Simple yet versatile, these blocks are perfect for setting the stage for your child’s imaginative play. They feature a stunning cityscape for toy cars or as a unique backdrop for their favorite action figures.
You’ll need a length of 2X4 lumber, chalkboard paint, a foam roller, a paint tray, and sandpaper. You can easily acquire the lumber from local stores at a minimal cost. These chalkboard blocks are an affordable toy solution and an avenue for your child’s creativity.
With a touch of chalk, your child can draw, create, and remake city scenes – the possibilities are as boundless as their imagination. These blocks will surely become a favorite in your household, providing countless opportunities for creative play. hellobee
27. DIY Toy Wooden Barn
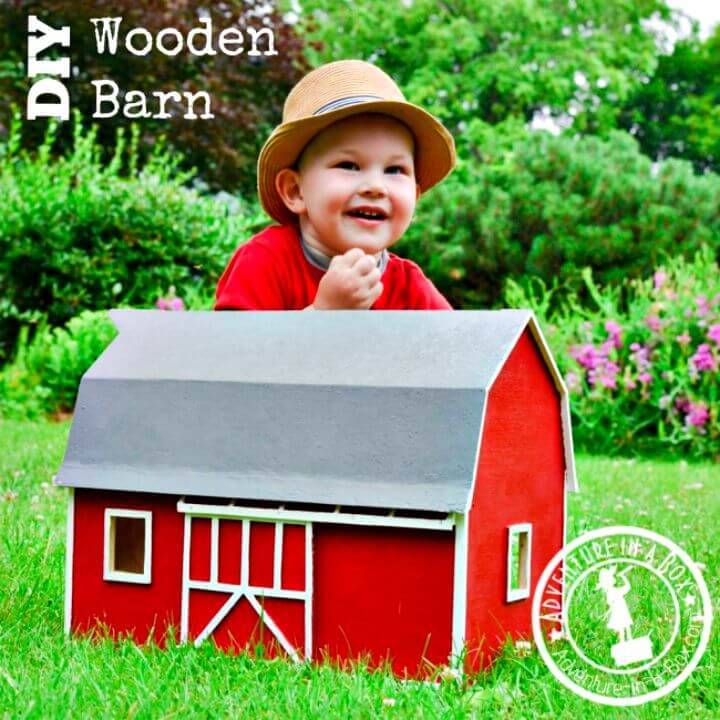
Diy wooden toys are not only cheaper than store-bought ones, but also safer and more durable. Make lasting memories and ignite your child’s imagination by constructing a custom DIY wooden barn toy! This durable, handmade toy has been play-tested and approved, offering countless hours of enjoyment. Made from versatile materials like plywood, dowels, and paint, this barn sets the stage for imaginative play, acting as a home to various farm and wild animal figurines.
From grazing outside in the summer to a cozy spot on the play shelf during winter, this play barn offers a valuable opportunity for your child to engage with nature, even if it’s on a miniature scale.
The real magic, however, lies in the personal touch and the limitless possibilities for customization. Whether adding a ladder to the loft or a sliding front door, your wooden barn will be unique. It’s not just about crafting; it’s about making a playtime experience your child will treasure. adventure in box
28. Turn a Cabinet Into Play Kitchen
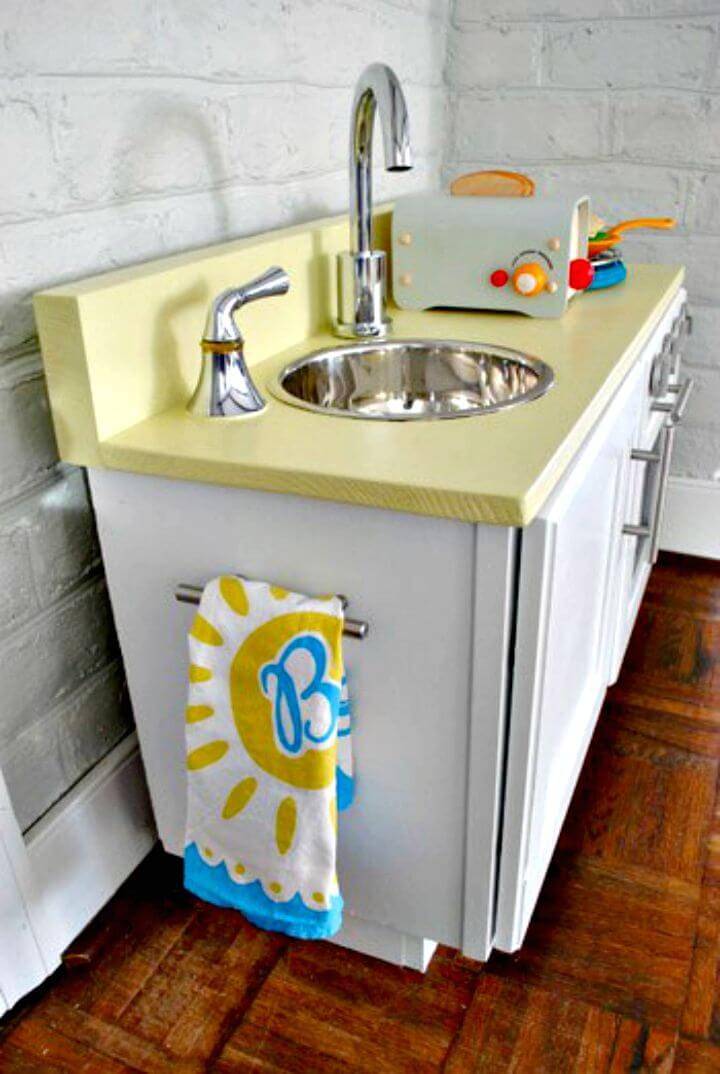
You can transform an old cabinet into the perfect play kitchen with a few tools and creativity! Put together an adorable, fun-filled play kitchen from a spare cabinet and give your child a space to emulate your culinary creativity. For under $99, you can craft a play kitchen with delightful features such as turning oven knobs, an illuminating oven light, a baking rack, and a movable faucet.
You’ll require a pre-owned cabinet, a faucet and handle, a stainless sink bowl, oven knobs and frame, hinges, plexiglass and wood trim, a wire oven shelf, a tap light, scrap lumber, and some hardware handles.
This kitchen will spark your child’s imagination, offering them countless hours of play. This cost-efficient project is a unique, engaging addition to your child’s toy collection. younghouselove
29. Make Your Kids Into Interchangeable Blocks
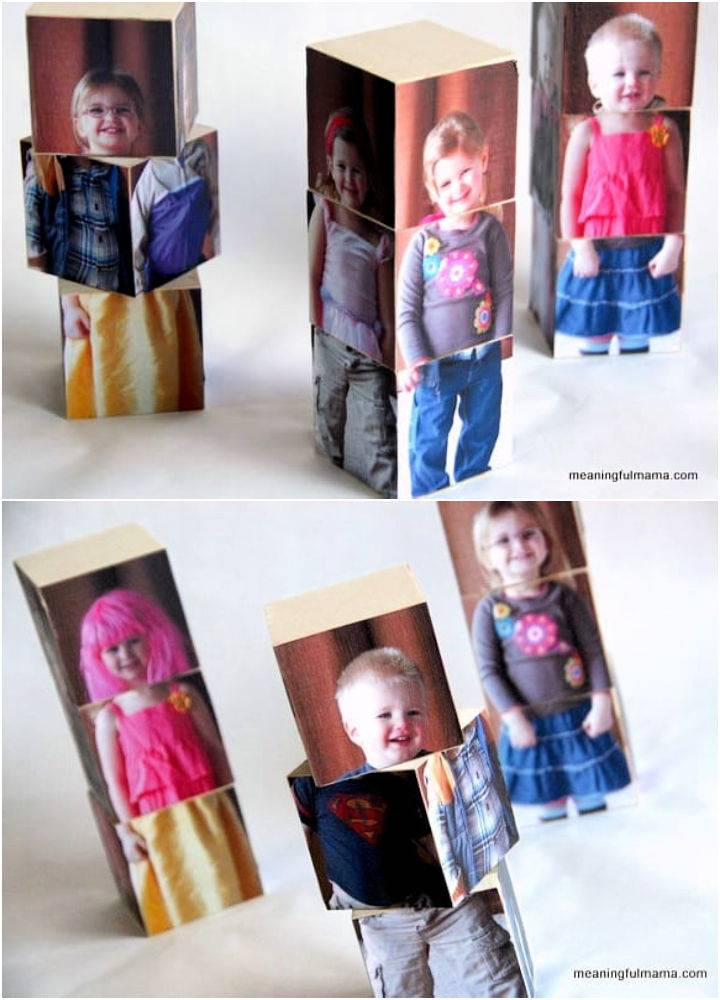
Instigate a new world of playful creativity in your children with a unique DIY interchangeable blocks tutorial. This project aims to craft a fun, interactive toy for kids using their photos on the blocks. This presents an excellent opportunity to familiarize them with distant relatives by incorporating their images.
Starting with a piece of lumber cut into square blocks and smoothly sanded. Next, engage your kids in an exciting photo shoot, capturing them in their favorite outfits.
The images are then resized, printed, and cut to fit the blocks perfectly. With the help of Mod Podge, the photos are carefully applied to the blocks, and voila! You have unique, entertaining toys that your kids will love. meaningfulmama
30. How to Make Mini Magnetic Blocks Toy
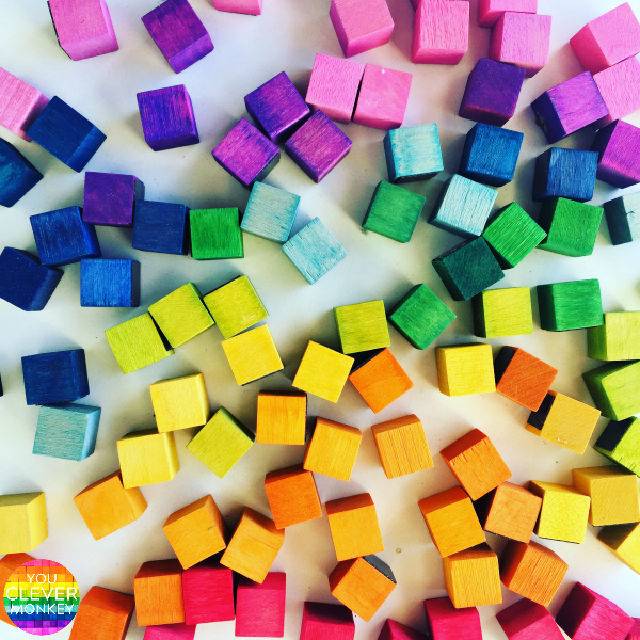
Learn how to make diy wood toys for your kids with these easy and fun projects. Add a pop of color and enthusiasm to your child’s playtime with these DIY mini magnetic wooden blocks! Engage their creativity as they build towers or make unique designs. You can turn raw wooden blocks into vibrant art pieces with liquid watercolors.
Additionally, self-adhesive magnet paper makes these blocks versatile for play on any metallic surface. The project not only nurtures your child’s creativity but also serves as a wonderful teaching tool. Use these blocks to illustrate grouping concepts or to foster fine motor skills.
However, please be aware that these blocks are unsuitable for children who still mouth objects due to their small size and non-sealed nature. Add a colorful dimension to play and learning by making these mini magnetic blocks today! youclevermonkey
31. Make Your Own Wooden Blocks
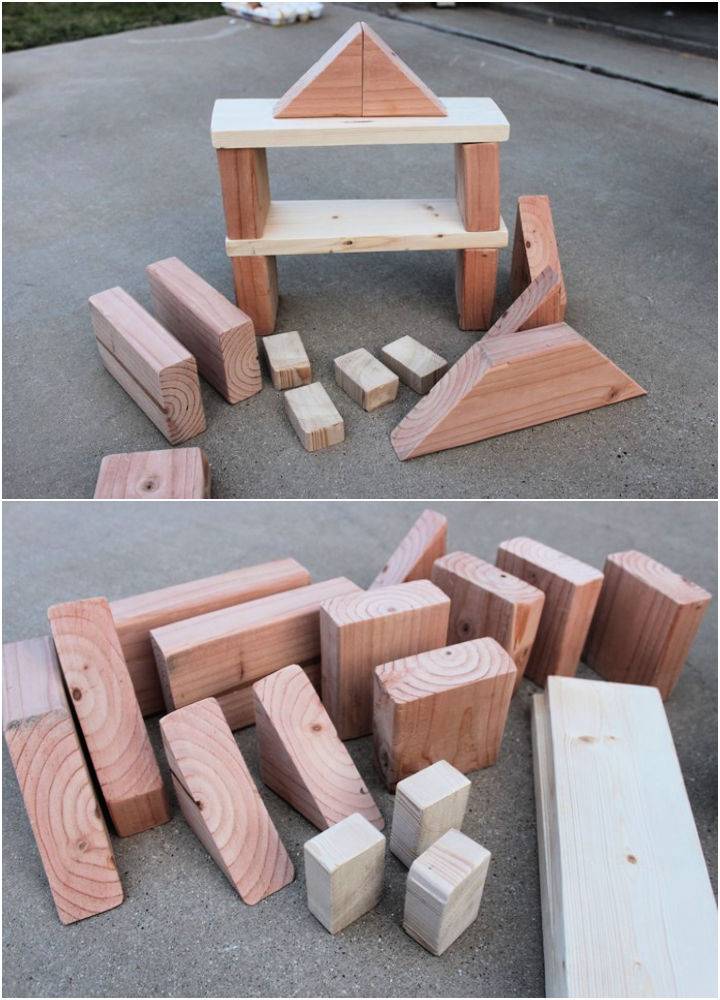
Celebrate a special birthday with a unique, handmade gift like a set of wooden blocks crafted with love and basic woodworking skills. This creative DIY project is perfect for children like two-year-old Owen, who is hard to shop for and may already have many toys. Children can use these blocks in various ways, like building structures or making ramps for toy cars.
The leftover wood may be used for future projects like a bathtub boat, extending the fun and creativity. This homemade toddler toy idea is cost-effective and presents an opportunity to bond and make lasting memories. Get your tools ready and start making your wooden blocks today! frugalfun4boys
32. Homemade Wooden Toy Camera
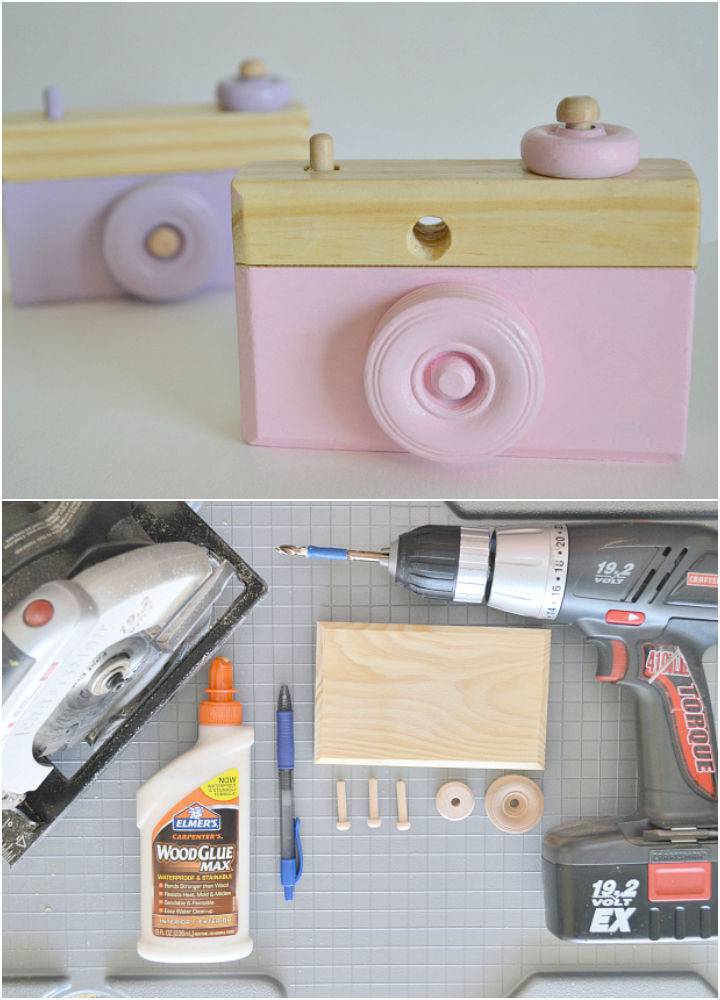
Make playtime more exciting and creative with a homemade wooden toy camera inspired by the high-quality craftsmanship of store-bought versions but with a fun, DIY twist. You can make a delightful toy to ignite your child’s imagination by starting with a basswood plank, some wooden pegs and wheels, a small spring, and wood glue.
The process involves basic cutting and drilling, allowing room for customization, like adding a pop of color. Completing this DIY project provides a cost-effective alternative and brings the joy of making a one-of-a-kind toy for your child. So, get your tools ready, and start building a keepsake wooden camera today! fawnoverbaby
33. 2 in 1 Pattern Building Blocks
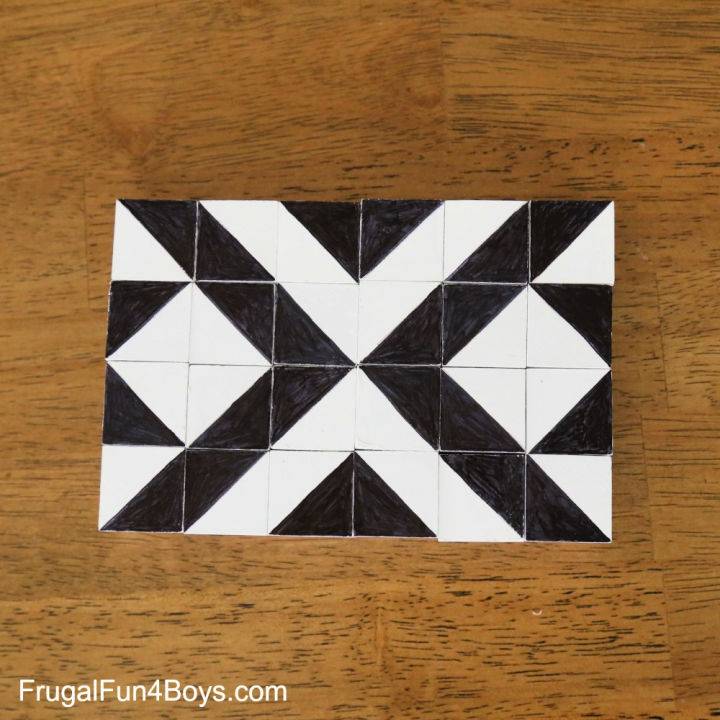
Elevate your child’s play and learning experience with DIY pattern blocks! This interactive, hands-on STEM toy not only amuses kids but also helps in fostering their creative and cognitive skills. You can bring this innovative concept to life using wooden cubes, paint, and Sharpies. Start by painting wooden blocks white, then draw center-aligned lines on each side with a Sharpie.
This unique project ensures they connect no matter how the blocks are turned. After crafting, your kids can form various open or closed shapes or even challenge themselves to build the longest continuous line.
On the opposite side, make a contrasting pattern with black and white triangles for added complexity and fun. The possibilities are endless, and every new pattern discovered adds to the excitement. So, inspire your children to explore and learn with this captivating project. frugalfun4boys
34. DIY Wooden Teethers, Rattles Toys
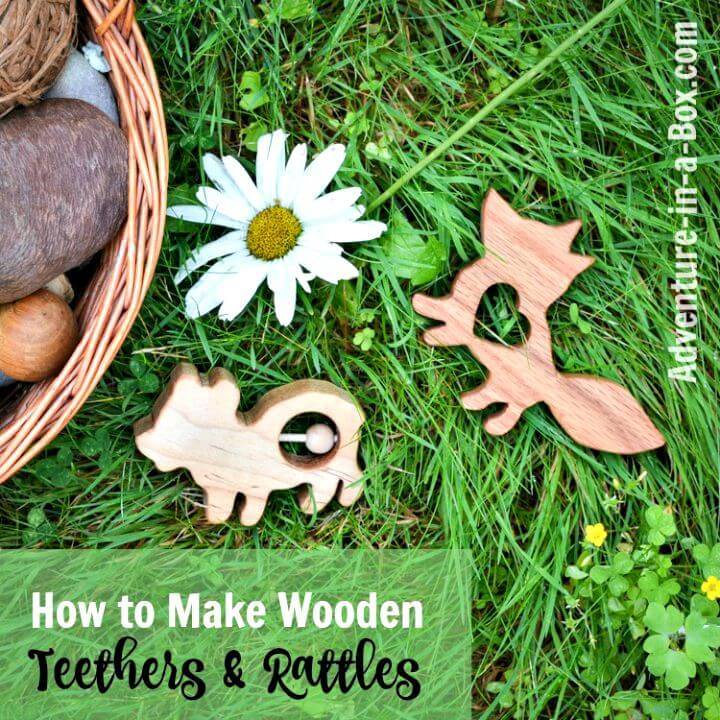
Get the joy of crafting your wooden toys for children with a scroll saw, a tool designed for easily making intricately cut designs. This DIY tutorial will take you through making simple yet beautiful wooden animals, from drawing a silhouette on card stock to finishing the toy with food-safe tung oil.
Different types of wood, like maple, walnut, cherry, and oak, offer unique characteristics and aesthetics. These safe and durable toys inspire a world of imaginative play, making them ideal for Waldorf-inspired activities.
This creative venture is a great way to spend time and cultivate a new skill. Dive into this exciting craft and watch as your list of projects grows, along with the smiles of the children who receive them. adventure box
35. Free Kids Workbench Plan – DIY Wood Toys
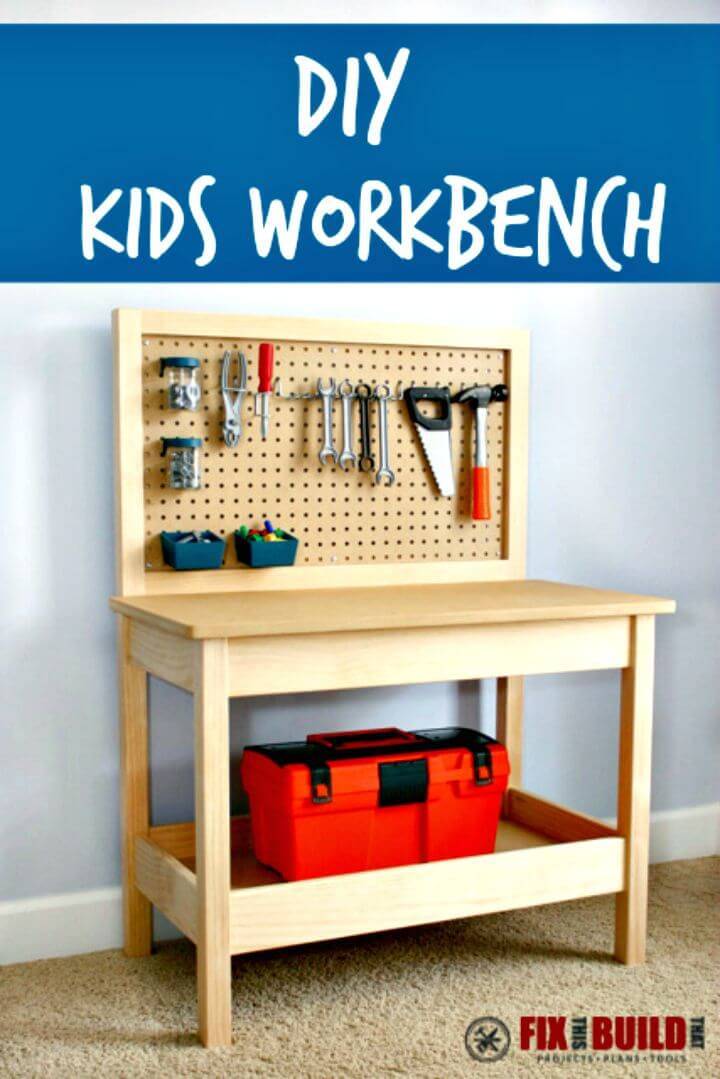
Gift your future DIYers a handy DIY kid’s workbench to spur their creativity and innovation. This workbench doubles as a functional workstation for the little hands in your shop or as a play area with plastic tools for safety.
Standing at a comfortable height of 24 inches, it features an additional storage shelf to hold all the bits and pieces and a pegboard for storing tools conveniently and tidily. The hidden pocket hole joinery makes a quick, pleasing project achievable over a weekend.
This piece is crafted using 2x2s for the legs, 1×4 for the stretchers, and 1/2″ MDF for the top and shelf. Using a Kreg K4 for drilling pocket holes ensures precision and quality artistry. Add some pegboard organizers, and your child’s new workbench is ready for action! Enhance your child’s imagination and playtime with this great project. fixthisbuildthat
36. Painting Your Own Matryoshka Doll
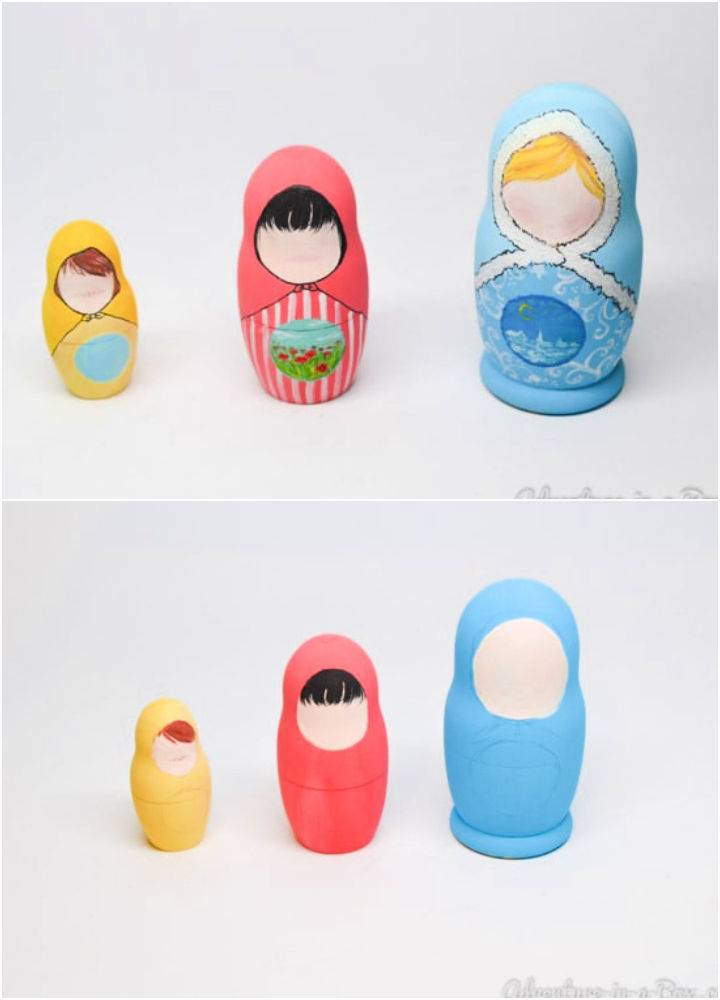
Unearth the timeless charm of making these DIY matryoshka dolls, a staple of Eastern European culture, teeming with educational benefits for children. From developing fine motor skills to understanding basic concepts of size, nesting dolls are much more than toys.
Making your own adds a personal touch, making it an interesting family project. You’re set to paint a piece of tradition with simple materials like a blank wooden set and paint (gouache or acrylics) and a dash of creativity.
This step-by-step guide will help you transform wooden dolls into vibrant matryoshkas, perfect for learning and play. Unfold the artistry within, and witness your child’s glee in painting and playing with these traditional dolls. adventure in box
37. DIY Tree Trunk Stompers
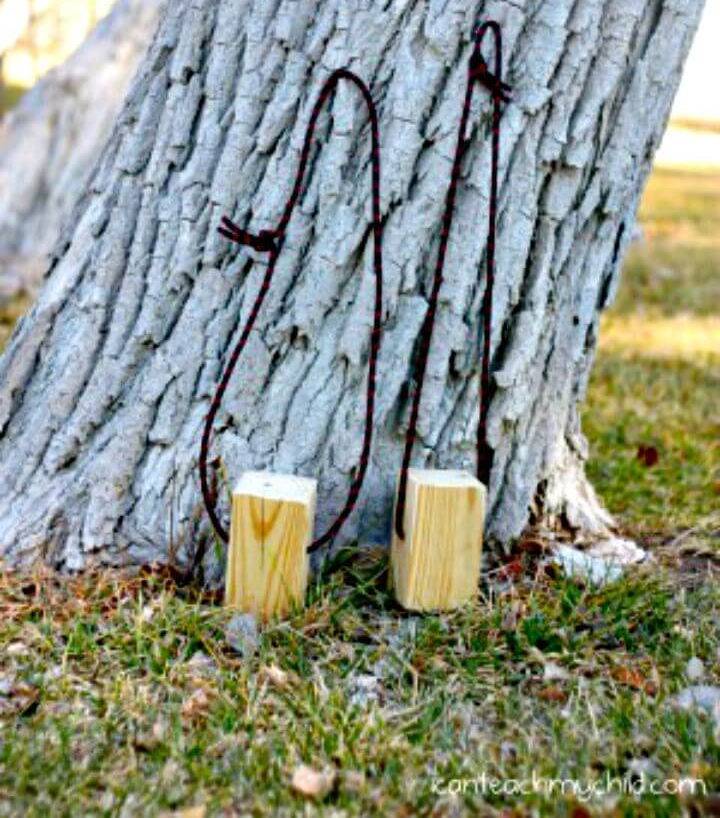
Explore the joy of constructing DIY wooden stilts, a thrilling, engaging, and skill-enhancing activity perfect for children of varying ages. This project provides immense fun and develops balance and coordination, proving excellent gross motor activity.
With a piece of 4×4 lumber, a saw, a drill, a sturdy rope, and sandpaper, you can build these great playtime tools. The construction involves cutting wood blocks, drilling holes, and securely tying the rope, making either a flat or ‘taller’ stilt for younger or older children.
The simplicity of the activity makes it an ideal addition to any outdoor event, like camping parties. The bonus is adults can enjoy the thrill too! Make this exceptional gift today and enjoy the smiles it brings! icanteachmychild
38. DIY Kids Wooden Tool Set
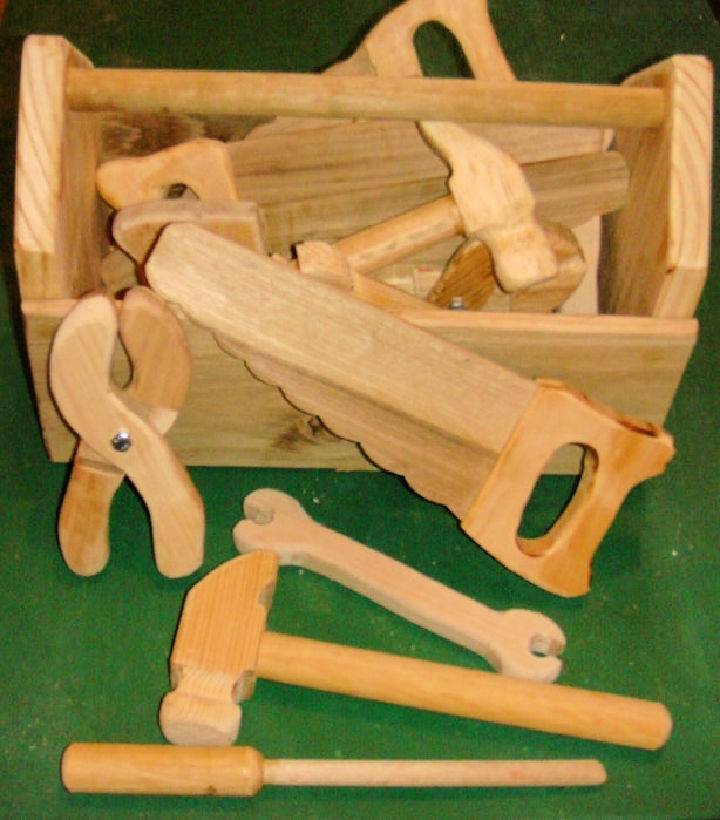
DIY wooden toys are a perfect way to add some charm and personality to your child’s toy collection. Boost your game today by making this unique DIY wooden tool set project, and experience woodworking like never before. Perfect for encouraging young imaginations, this playful collection of toy tools is crafted from readily available materials.
From light wood to dowels, a few basic items and common workshop tools like a drill, router, and saw are all you need to bring this fun project to life. This engaging project also showcases a charming miniature hand plane, sure to captivate young minds.
Plus, the whole set can be crafted from a single 2×6 board, making it economical and eco-friendly. Why not transform a simple playdate into a creative woodworking session? So, twist up your sleeves and start building this whimsical wooden tool set for your little one’s today! instructables
39. Airplane Hand Plane Tutorial
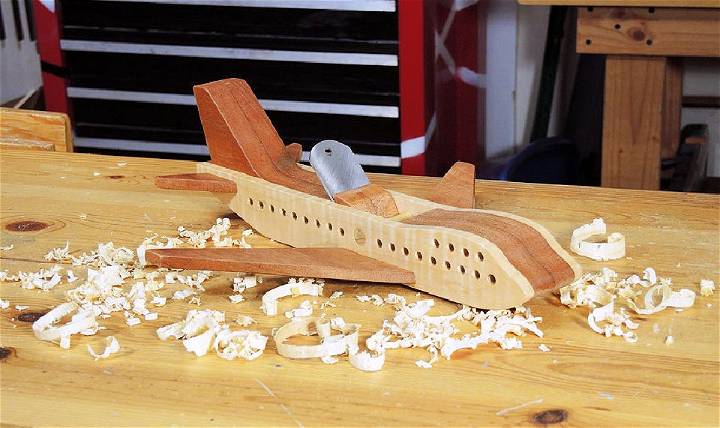
Heighten your woodworking skills with an exciting DIY project – crafting an airplane hand plane! Made from mahogany and maple, this aesthetically pleasing tool is an available plane and a decorative display piece in your woodshop. It’s also an engaging and safe way for children to be introduced to woodworking. The eight-step process includes the following:
- Printing templates.
- Cutting and assembling parts.
- Applying a finish.
- Making shavings with your completed tool.
The main materials you’ll need are mahogany and maple wood, a suitable blade, and the finish of your choice. This innovative creation offers a unique blend of practicality and creativity, being both an operational tool and a fun toy for young crafters! instructables
40. DIY Dollhouse in a Box
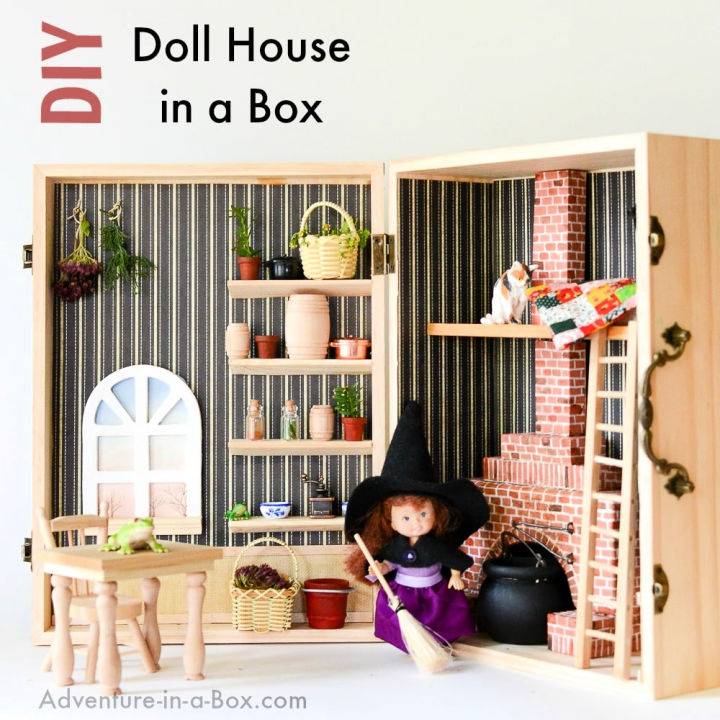
Release your inner craftsperson with this easy and fun DIY dollhouse-in-a-box project. This portable and versatile toy invites creativity and offers endless storytelling opportunities. You only need a wooden box, scrapbooking paper, craft sticks, paint, and glue to transform an ordinary container into a delightful dollhouse.
Whether it’s a witch’s hut or Little Red Riding Hood’s grandma’s house, you can adapt this project to any setting. The best part? It’s not too fragile, making it a perfect toy for young ones. Plus, it’s an affordable project that doesn’t compromise on charm or fun. So grab your supplies and make a magical dollhouse to spark imaginative play. adventure box
Related DIY Projects to Try
Explore easy DIY projects for kids – from toys to play areas, keep them engaged & having fun. Low-cost and simple builds for endless family creativity!
- DIY Toys: Spark your child’s imagination with these amazing DIY toys you can make at home, perfect for hours of creative and educational play.
- Crochet Toys: Delight your little ones with these free crochet toy patterns for beginners, featuring a variety of adorable and cuddly crochet toys.
- DIY Fidget Toys: Help kids focus and relieve stress with these easy DIY fidget toys, designed for fun and tactile engagement.
- Wooden Baby Gym Ideas: Stimulate your baby’s senses and motor skills with these inspiring DIY wooden baby gym ideas, perfect for early development.
- DIY Slingshot: Encourage outdoor play and target practice with these quick DIY slingshot ideas, suitable for various skill levels.
- Cardboard House Ideas: Make eco-friendly and imaginative play spaces with these unique DIY cardboard house ideas, perfect for hours of fun in a cardboard world.
- Toy Storage Ideas: Keep your child’s play area organized with these practical DIY toy storage ideas, perfect for any space and style.
- Outdoor Toy Storage Ideas: Maintain a tidy and inviting yard with these cheap DIY outdoor toy storage ideas, designed to keep your outdoor play area organized.
Other DIY Projects
- DIY Cat Toys: Entertain your feline friends with these cool DIY cat toys anyone can make, perfect for stimulating their natural instincts and curiosity.
- Homemade Playgrounds: Transform your backyard into a fun-filled oasis with these best DIY playground ideas, perfect for hours of outdoor entertainment.
- Play Kitchen Ideas: Inspire your little chefs with these superb DIY play kitchen ideas, guaranteed to spark their creativity and love for cooking.
- DIY Ball Pit: Make a soft and colorful play area with these simple DIY ball pit ideas that anyone can make, perfect for indoor or outdoor use.
Conclusion:
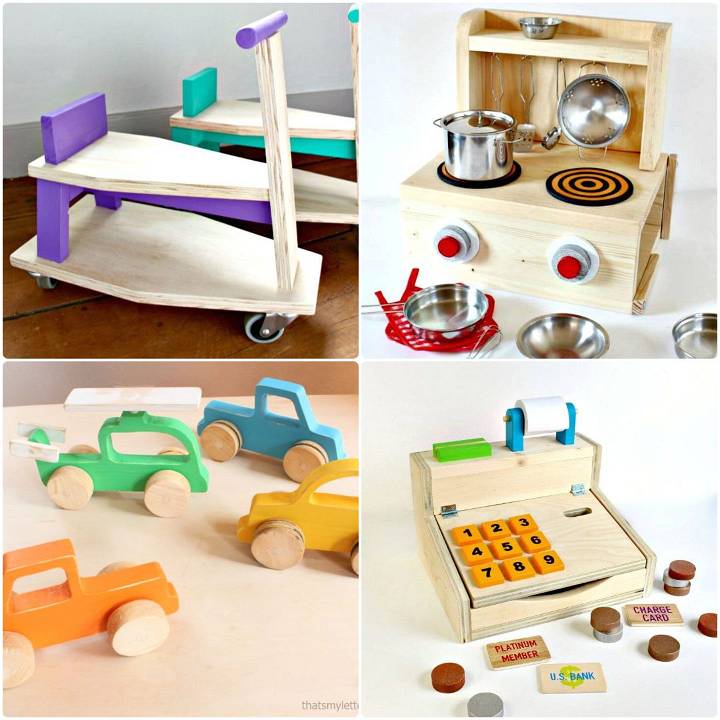
In conclusion, diving into the project of making 40 easy DIY wood toys for kids offers not only a chance to craft unique and personalized gifts but also opens up a world of learning and bonding opportunities.
From mastering simple techniques to understanding the educational benefits such as fostering creativity and enhancing cognitive skills, this guide has equipped you with everything you need to start creating. Remember, safety comes first, so always prioritize proper precautions while working on your projects. Happy crafting!


